 In-FLU-enza…H1N1…Tamiflu…all words that none of us actually care about or even think about – that is – until we stumble into the doctor’s office, eyes glazed, throat that could only feel worse for a fire eater and muscles that scream four letter words at us, as we try to use them. THEN, the flu becomes a reality and a reason to think seriously about finding a sky scraper from which to jump. Such was the past week for Mr. Fix-It and me. He succumbed first. I knew he was sick when he willingly grabbed his keys and left the house early last Sunday morning to hit up the AM-PM clinic for drugs. ‘Mr. Fix-It’ and ‘getting medical help’ are not usually in the same sentence. Since he only had a fever of 99.9, after a nose swab, Mr. Fix-It was rather taken aback when the doctor forced a mask over his face and admonished him not to go anywhere, including work, for 5 days. The doctor was stern in his warning and typed up a letter to give to the boss. He told Mr. Fix-It that he was highly contagious and so he came home, not entirely convinced that he was really THAT sick. But then, Sunday afternoon hit. My hubby was a mess. His fever was quickly inching to 104º and I was frantically making preparations to get him to the hospital. I had tried everything…tylenol, ibuprophen, tepid bath, alcohol rub and then I remembered an elderly doctor’s method quite a number of years ago when our son’s fever had gone to 105. I filled plastic bags with ice, wrapped them in towels and put them under Mr. Fix-It’s arms, on his stomach and on his forehead. Magically, the fever dropped to 102º. All evening I battled the fever and Mr. Fix-It’s irrational statements that let me know he was NOT all with me. By midnight his fever broke and he actually slept while I transferred myself to the couch, hoping to avoid the disease. About 3 am I woke up shaking from head to toe, teeth chattering so hard that I could not keep my mouth shut and throat literally shooting flames. Oh no. Somehow, I made it to the bedroom and crawled into bed next to my ailing husband. I figured that I might as well be comfortable now that I had caught the germs. Of course, I woke him up with my shaking and he crawled out of bed to get me some tylenol and water. I thought I was going to die. We figure that Mr. Fix-It brought the germs home from the VA Hospital where he had done a computer installation the week before. Ten days is the incubation period and it had been ten days since his visit. I am sure that I picked the germs up from his clothes or from him. Who knows? All I know is that neither one of us has had the flu in years and years and years and years and so the ferocity of the disease was rather disturbing. It has taken both of us over a week to get back to normal. But, as always, I could see that there was a humorous side to our plight. I made it to the doctor as well…just our family doctor…and I found out that just the word ‘flu’ nearly tatoos an ‘F’ on your forehead and hangs a sign around your neck that announces, “Unclean! Unclean!” I was told to wear a mask throughout my visit and the nurse who swabbed my nose (might I add that this is one of THE most unpleasant tests on the planet – because your sinuses are already swollen and raw without a q-tip being twirled around the membranes like a chimney sweep’s broom!) barely stuck her head back in the door and said through clenched teeth, “It’s flu!” And it wasn’t just the flu-flu. It was the BAD flu. As I left the room with prescription in hand, the cleanup crew was already disinfecting everything I had touched. Even the woman who checked me out, handed my Visa card back to me, washed her hands, grabbed the pen I had been using, disinfected it and wiped the counter right in front of me. As I stepped back, I felt like I had smallpox. I slunk past ogling patients, bemasked and humiliated. Two days later, still diseased and miserable, I needed to somehow get an order to a friend, who had come in from out of town. We discussed the logistics of this feat without germs and it was agreed that Mr. Fix-It, who was well on the road to recovery, would drive me to a designated meeting place. He did so and when we arrived, dear friend stepped around her vehicle and waved, at a safe distance of 50 or so feet away. Mr. Fix-It got out of our vehicle, placed the box of goodies onto the pavement of the parking lot between our car and Friend’s and proceeded to soak the box with spray Lysol: Bottom, sides and top. The contents had already been lysol’d. I was looking around for Homeland Security to come swooping in with a bomb squad and handcuffs for each of us. 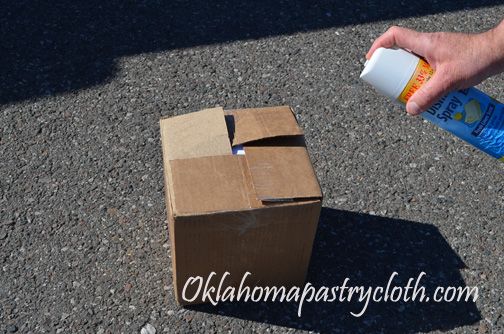 We got back into our car and Friend picked up the box to place in the back of hers. Hopefully, all germs were murdered by Lysol drowning. Now, I have to tell you that being sick is a boring state of being, but thanks to this same Friend, I was given a fun craft project that served to pass my time in bed and produce lots of little bows. She sent me an email with directions for making tiny bows that are so handy for a multitude of projects. And, heh, when you are running a fever and eating popsicles a new craft is a welcome distraction!! All you need is some 1/4″ ribbon, preferably a light weight or organza type, scissors and a four tined fork. 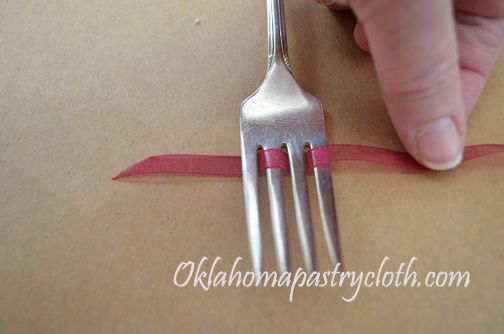 First, begin by running the ribbon under the first tine, over the second, under the third and over the forth. 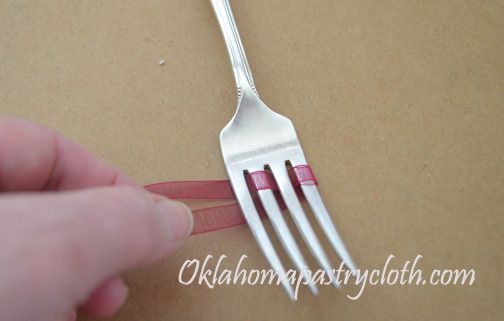 Pull the ribbon under the fourth tine and pull it all the way to the first tine. 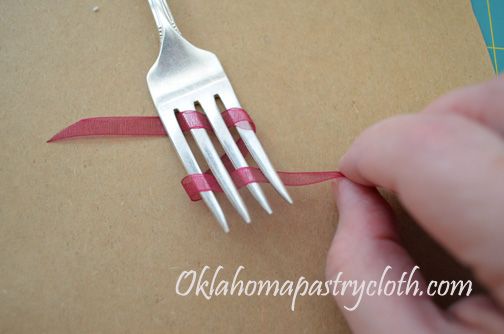 Now, go over the first tine, under the second, over the third and under the fourth. 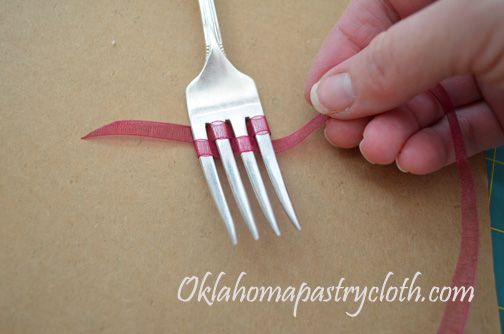 Push the ribbon up to the end of the tines to keep it tight. 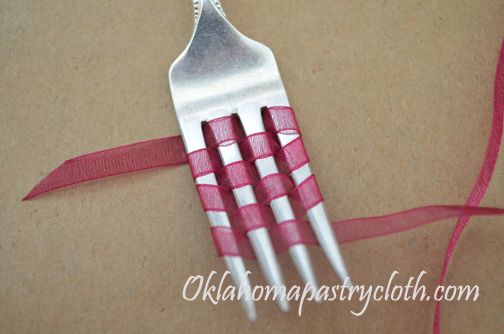 Continue the process until there are either two or three (depending on the size of bow you want) wraps around the outside tines 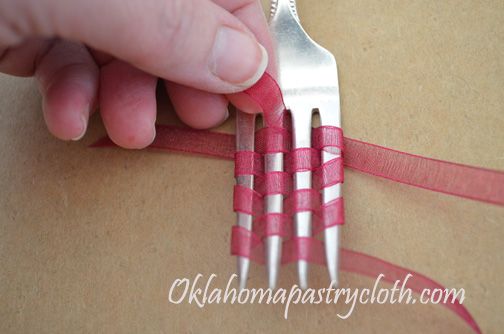 Clip the end of the ribbon that is attached to the spool and now run a fresh ribbon end up through the tines between the second and third one and in front of the first row of weaving 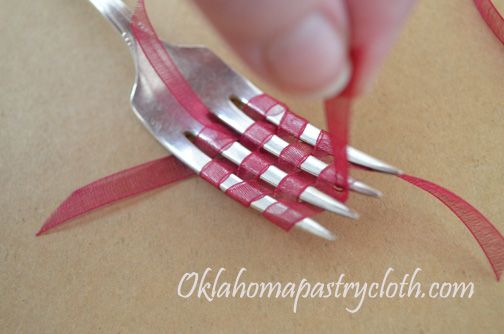 Pull up other end of this ribbon and clip off, leaving enough that will make it easy to tie 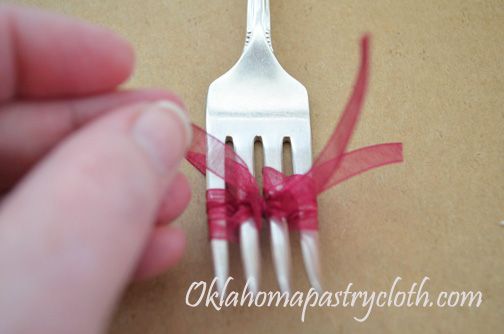 Pull the two ends up, gathering the center of the woven ribbon together, and tie at the center in a knot  Slip the bow off of the fork and clip off extra ribbon. The bottom bow was done with two rows and the top one was done with three rows  Use to decorate cards, hairclips, clothes and anything else you can think of!  |
|
| |
|
Oklahoma Pastry Cloth™ Company on Facebook
|
|
 |
|
|
|
Posts Tagged ‘humorous’
A Sick Bed Craft
Wednesday, February 20th, 2013
I Am Woman!!
Thursday, February 7th, 2013
 Don’t forget to leave a comment to enter the Valentine’s Day Giveaway! Winner will be chosen on Monday, Feb. 11, for a basket of Prairie Blessings Soaps, handmade right here at the Oklahoma Pastry Cloth™ digs.  It was time to go to the chiropractor – a part of my week to which I aways look forward. I feel soooo good after a visit to Dr. Ryan and so it is no effort to make the long drive to his office. But I got into my car – my relatively new car – and turned on the key to absolutely no sound at all. No click. No whir. No nothing. The battery was dead. Why was the battery dead? Because there just has been no battery invented, to my knowledge, that stays charged when the dumb driver leaves the key turned to auxillary for a couple of days. Of course, Mr. Fix-It wasn’t here. In fact, he wasn’t even in the near city. He was two hours away. I called him on his cell phone and he asked what all men ask: “Why is the battery dead?” And I actually thought about spinning a yarn of an alien spaceship that landed in the front yard and sent out weird electronic waves that killed every battery in the area…”I KNOW dear. That’s just crazy isn’t it? I wouldn’t have believed it if I hadn’t seen it with my own eyes!!” But I didn’t. I told him the truth and took my lumps of typical male explanations on how I must be more careful and observant about taking the key out of the ignition. Which I should. We discussed my options, including an attempt, on my part, to roll the car onto the driveway next to my son-in-law’s sporty Monte Carlo that is visiting us on vacation due to a blown head gasket (I’m pretty sure that’s worse than a dead battery) – problem being, that the Monte Carlo’s hood is the equivalent of a slab of granite and can only be lifted by a pair of Olympic weightlifting champions. My fate was sealed to pedestrianism, 40 miles from the doctor’s office and 25 miles from any semblance of civilization. My friend pointed out that I could call the insurance company and make use of the ‘roadside assistance plan’ for which we pay. She was so logical in her reasoning, “It’s what you pay good money for!” However, I was experiencing a twinge of that sin that has brought down complete societies in one, fell swoop…..Pride. I did not want to have to drag some poor schlub all the way out to the boonies for a 5 minute job required by a stupid female who doesn’t pay attention. Now, there is nothing more inventive or creative than a woman in trouble. If the government would just put a group of women in a room and tell them that the national debt will cause chocolate to become nonexistent by the end of the year, within two weeks, those women would have the debt paid off, the credit card cut up and Washington, D.C. employees eating mashed potato sandwiches from sack lunches. So when I discovered a car battery sitting on a work bench, my little brain began to form a plan. While the Monte Carlo hood is granite, a car battery is a close second in weight. Those suckers are heavy….and dirty…and oily. I donned a full apron to protect my clothes, which added a floral accent to my situation, and tried to lift the square box. It did not budge. I quickly figured out that one must emit that same “arrrhhhh” that weightlifters’ grunt at the point of assuming full impact of a heavy object in order to make it move. I did so, and lifted the battery into my arms, struggling on buckling legs to transport it in front of my little Nissan Versa. Realizing that I could not hold the battery and bend over to place it on the floor, without dropping it and sending acid all over me and my pretty, floral apron, I looked for a “stand” on which to place it. Fortunately, there was a stack of boxes of canning jars and so this acted as my table on which to place the battery. Next, came the job of opening the hood and as I had never done that to this particular car, I had to get a flashlight and then use the engineering skills that I don’t have, to figure out how-in-the-world the latch worked. Of course, it couldn’t be just a simple latch. No. It had to be one that had multiple levers that acted in concert with the movement of the main clamp, which had to be pressed in a direction that made absolutely no sense. Finally, getting the hood up, I couldn’t find that little stick thingy that holds the hood in place. I searched everywhere, with the blood draining out of my arms while I held the hood above my head to keep it from slamming down on my body for someone to discover the hideous picture of a car that had eaten its owner. That engineering skill, that I don’t have, whispered to me to find the hole in the hood and then trace that directly below to the frame where the stick had to be in order to fit into the hole. I searched and searched on the hood for that recepticle and probably looked directly at the little stick thingy, clamped across the hood, at least a dozen times. It finally screamed at me, “I’m right here, stupid!!!” and I managed to support the hood. Then came the scariest part: Electricity. I had the jumper cables ready, and I knew that black went to black and red to red and that black is negative and red is positive which is soooo confusing since in the business world, black is positive and red is negative (just try to run a bank account in the red and convince your bank that’s a positive thing – well – yeah – the government does that). I carefully placed the clamps on the posts of the two batteries, gritting my teeth in expectation that I was about to arc weld the frame of my car to every steel component of the motor. Surprisingly, there wasn’t even a spark and when I turned the key in the ignition, the car started!!! I did my best imitation of a “goal post dance” and wanted to growl like Tool Time Tim. Yessss! I might as well have invented the automobile with the sense of achievement I felt. And speaking of a sense of achievement. I discovered something rather wonderful this week. Most of you are probably not as ancient as I, and probably don’t remember Dannon’s Fruit On The Bottom Yogurt. That was a staple for me throughout my college years. I would go to the student union cafeteria and load up on cups of Dannon Apricot and keep that in my little frig for late nights at the Art Barn or studying for a test. But Dannon Fruit In the Bottom Yogurt went away. There was something about that yogurt with the tart chunks of apricot and the lumps of yogurt that burst in your mouth between smooth and creamy spoonfuls. Anyway, the other day, in making yogurt, a brilliant idea hit me. I have tons of apricot jam made from the bounty of Sir Flying Ace’s apricot tree. I put a couple of tablespoons of that jam into the bottom of my yogurt cups. Then, in my pan of warmed milk, I added vanilla and stevia to flavor the milk and then did my usual adding a little warmed milk to the starter, pouring that mixture back into the milk. I poured the milk and starter mixture over the jam into the cups and placed the cups in my yogurt maker. Oh my gosh!!!! When cooled in the frig and then gently mixed to bring the fruit up from the bottom, that yogurt tasted exactly like that which I ate in college. It is wonderful. I have now tried it with homemade strawberry and blueberry jams as well. 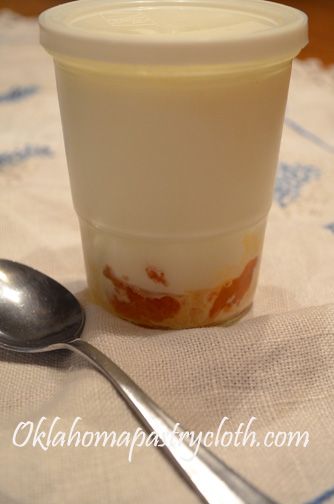 But to beat everything, I was out of buttermilk the other day and on a whim, decided to use that yogurt instead, for a batch of pancakes for Mr. Fix-It. I sustituted exactly the same amount of the fruit yogurt for the amount of buttermilk I would have used. Mr. Fix-It has said that he wants me to make pancakes that way from now on. They were amazing. So here is my recipe. I am sure that you can use just plain yogurt the same way, but that fruit really made some wonderful flapjacks!! One note: The yogurt must be live culture. The blended yogurts and those with additives won’t work. Ingredients: 1 large egg 1 1/4 cup yogurt 1/2 tsp soda 1 1/4 cups sifted flour 1/2 tsp vanilla 2 tbsp melted butter 1 tsp baking powder 1/2 tsp salt chopped pecans (optional) Printable Recipe Sift together flour, baking powder and salt and set aside. In a mixing bowl with a whisk, beat together egg and yogurt until smooth. Add baking soda and mix. Add flour mixture and stir until smooth. Add vanilla and butter. If batter is too thick, add enough water to give it the consistency of hot pudding.  Pour batter onto a hot, well-oiled griddle, heating to around 350º. Sprinkle with chopped pecans. Cook until brown and turn to cook the other side.  Serve with butter and syrup. Good eatin’!!!  |
|
| |
|
Oklahoma Pastry Cloth™ Company on Facebook
|
|
 |
|
|
|
The Mundane Things in Life
Tuesday, February 21st, 2012
 My car died. It didn’t just stop. It bled to death, a pool of oil tracing its way across the driveway and into the grass. I had just driven in from shipping orders and Mr. Fix-It asked me if I had checked the oil lately. Are you kidding? Am I my auto’s keeper? Ok, so I had to admit that I had not. The car needed to cool down after its trip and so it was forgotten for a couple of hours. It was then that Mr. Fix-It came in, rather stern-looking, and informed me that there was no oil in my car. Oh no!! How could that be?!! Like most women, I feigned horror, not really sure that having no oil in the car was all that big a deal. I followed Mr. Fix-It to my vehicle and watched as he poured 5 quarts of 10W-40, through a funnel, into the oil reservoir, while schooling me of its importance. He checked the dipstick and still there was no oil. What? But under the car, there was a bucketful!!  Mr. Fix-It declared my lovely, champagne-colored Toyota Camry a dead duck. Of course, most cars become dead ducks after they have been driven for 210,000 miles, but I had been sure that this one would live to another 100,000!! As it was, I no longer had wheels. That’s bad. Trust me. Mr. Fix-It drives a big, honkin’ Ford and I have always had the small cars in which to tootle around and save gas. But now, I was seriously short on tootlin’ machinery and didn’t need gas! I think that I have written about the Afghanistan truck before. It is a small Toyota pickup exactly like the ones used by the Taliban to bomb buildings. Ours looked like one of those trucks AFTER the bombing. We got it for $100 and Mr. Fix-It made it work like new. However, the body looked like someone had hit a tree with the front hood and then had backed into another one with the rear bumper. Two opposing ‘V’s’ would be an apt description. And somewhere in there, a bomb may have crunched the tailgate. I had driven that truck on occasion as have most of the children when they were in-between vehicles, but the Afghanistan truck was finally given to our son-in-law for him to use with his projects.  In its place, we received a little 1988 Nissan truck, with a camper on the back and only 73,000 miles on it, from my mom and dad when they moved from Tennessee to their retirement community. It has a 5-speed manual transmission and is the very basic package that includes no radio, no cup-holders and no place to hang your cell-phone. Oh wait. Did they even HAVE cell phones in 1988?? But it has the most comfortable seats and shifting is pretty smooth….that is….unless you are in downtown Oklahoma City or Edmond and you are me. Oh my. Talk about stress and a headache. Today, I was the little ol’ lady with the gray hair, holding up traffic as I attempted to pull forward at a green light, and killed the engine twice until I finally figured out I was in third gear. Traffic does that to me. My mind turns to mush. And other drivers’ hands turn to shaking fists. And so, Mr. Fix-It and I have embarked on the fun and enlightening pastime of car shopping. Yes, that is an activity that is sure to leave you with the immediate need to hit the shower and remove the slime that has been sent your way by car salesmen. We even had the made-for-tv experience of the salesman seating us in his office, disappearing and then hauling in the “manager” to see if he could “get us into the car of our dreams.” I mean, how cliché is that? One dealer asked me what I do and I tried very hard to explain my business. He is still convinced that the Oklahoma Pastry Cloth™ helps you slice onions and cucumbers. Don’t ask me why. I gave up after his fiftieth interruption to correct me about its use. Yep, cars are a necessity but car dealerships are not. It is with that realization that I have hit Craigslist. I will keep you posted on the outcome.  |
|
|
Oklahoma Pastry Cloth™ Company on Facebook
|
|
 |
|
|
Sourdough Bread on the Oklahoma Prairie (and recipe)
Tuesday, November 3rd, 2009Sourdough bread is the oldest kind of leavened bread known to man. It is earliest recorded in Egypt around 1500 BC, but how it was discovered is total conjecture. There are all kinds of good stories regarding the discovery of the potent dough, but it is anybody’s guess how the first person suddenly decided to use wild yeast to make their usual flatbread rise to a fluffy loaf. Of course, with all of the brewed products available back then, like wines and beers, it is conceivable that some might have spilled into flatbread dough or that dough was left out and attracted the plentiful wild yeasts to produce a bubbly sponge, but I’ll leave you to your imagination to come up with “the story” of how sourdough starter was discovered.
My own imagery conjures up a man who stumbles home after a night out with the boys, precariously grasping a clay jar of strong Egyptian beer (brandname Pharoah’s Choice), and occasionally managing to find his lips to take another swig. As he wobbles into his humble abode, he finds his dutiful wife on her knees, mixing a batch of dough to bake for the next day’s flatbread allotment. Mr. Ancient Egyptian lunges toward his wife to give her a drunken hug, as she stands to greet him, and as if in slow motion, the clay jar of suds pitches out of his loose grip, flies through the air and lands squarely on the floor, shattering to pieces and sending waves of dark ale into Mrs. Ancient Egyptian’s bowl of flour and oil. Mrs. Ancient Egyptian lets loose with a string of hieroglyphics and cries over her ruined bread. The mess goes into the trashbin, also made of pottery, and the angry wife stomps off to bed. Next morning, she awakens to find an oozing, bubbly live thing, growing in her trashbin and out of curiosity, the Mrs. pours the doughy sponge into her floured breadbowl because she didn’t have an Oklahoma Pastry Cloth™, picks out any bones that had also been thrown into the trash from dinner the night before, adds some flour and then bakes the dough in her 400 degree brick and mortar oven. Out comes a tall, fluffy confection that she tentatively samples. A smile gradually replaces her angry frown and she comments, (in ancient Egyptian of course) “This bread is tangy and light – a veritable pastry worthy of royalty! I would think that it would be quite good with jam and tea.” As a result, she forgives her husband and encourages him to come home and drop his ale into her bread on a regular basis. I’m sure that it happened that way.
Sourdough starters are made with a variety of ingredients. Depending on the taste desired, milks, potato water, sugars, and various types of flours are incorporated to create a “sponge”. This sponge is continually “fed” to keep the yeast alive and thriving and as it is nursed, it develops its own particular flavor. Personal taste determines which characteristics are desirable or not.
Just a bit of historical trivia: According to www.kitchenproject.com, during the gold rush days in San Fransisco, California, a bakery run by the Boudin family from France used sourdough culture to create a unique and famous bread that miners enjoyed every morning. Since 1849 they have been using the same sourdough culture, which they call a “Mother dough” and the same recipe. So important is their “Mother Dough” it was heroically saved by Louise Boudin during the Great San Francisco Earthquake of 1906. Here in Oklahoma, sourdough starter has been used on the prairie through days of wagon trains, landruns and cattle drives to produce biscuits, pancakes, muffins and bread. It doesn’t take long to find a class here, where one may learn to create these morsels in a dutch oven nestled in the coals of a campfire.
Every sourdough sitter considers their starter to be the best. As in the case above, many starters have been handed down through generations of bread bakers. However, it is possible for you to start your own legacy and tweek it to your own taste. You can make the base recipe that follows, and then divide it to keep some going as a pristine culture and experiment with various additives like milk or potato water instead of just plain water on the rest. Also, as your culture becomes exactly what you like, it is a good idea to pour some onto wax paper and allow it to dry into a flat sheet that can be broken into small pieces and stored in a tightly sealed jar. If something horrible happens to your live culture, you can start over by adding two tablespoons of dried culture with 2 tablespoons of water to reconstitute and bring to room temperature and then start your usual process over again with this base.
If you are not going to use your starter for a time, you can put it in a jar with a tight fitting lid and store it in the refrigerator. I have also had luck with freezing cubes of my starter to then thaw to room temperature and start the process over. And one last tip that I use: I use bottled spring water to hydrate my starter, as city water has chlorine that kills the yeast and well water can have bacterias that ruin the taste.
I have tried a variety of starters and have come up with my favorite that is very, very simple. If you wish to be truly “pioneer”, then you would omit the yeast and let this starter stand for three days, stirring once each day, to capture any wild yeast in the air. When you start seeing bubbles, you start the “feeding” process. I personally like the flavor achieved from adding a little powdered yeast to get started. Again, if you wish to be “pioneer” in making the true, slow, sourdough bread then you would follow my bread recipe, ommitting the yeast and allow your dough to rise for as long as 24 hours, but I am including in the recipe, two teaspoons of yeast in case you do not wish to wait that long to have bread and still have the sourdough flavor.
Starter Recipe
3 tbsps whole wheat four
2 1/2 tbsps warm water
1 tsp powdered yeast
In a crock container or other opaque glass jar, mix ingredients with a wooden or plastic spoon. Do not use any metal utensils or containers. Allow to stand overnight, covered with cheese cloth. Next day, stir in 2 more tbsps of flour and 1 1/2 tbsps water. Stir and let stand overnight. Continue this process each day of using 2 tbsps flour (you can use white flour at this point) to 1 1/2 tbsp water until you have approximately 1 1/4 cups of starter. At that point, you have enough to make a loaf of bread. You must have enough starter to be able to remove 1 cup and still have some left to continue feeding for the next time. As the starter grows, it should be bubbly and pungent. Overnight, if a liquid rises to the top, just stir it in and continue feeding. Each time you make bread, it is a good idea to transfer all of the starter into a clean jar or bowl and wash the container that houses the starter to keep mold from ruining it. Dry the container and return any culture that is left after removing a cup and start the feeding process again.
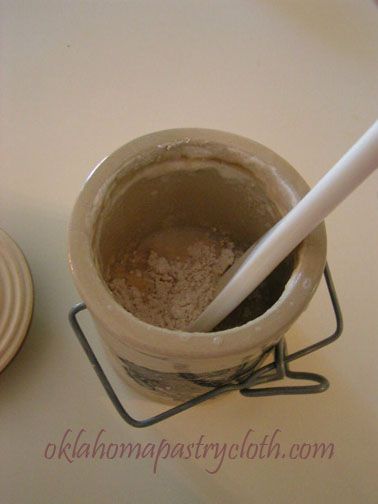
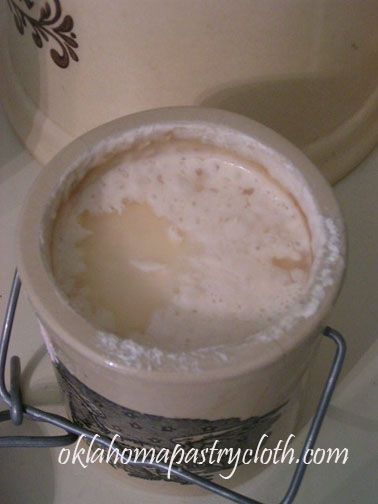
To make bread:
1 cup sourdough starter at room temperature
3/4 cups warm water
2 tsps yeast
2 tbsps honey or sugar
1/4 tsp baking soda
2 tsp dough enhancer (lecithin)
3 cups high gluten flour either whole wheat or white or combination of both
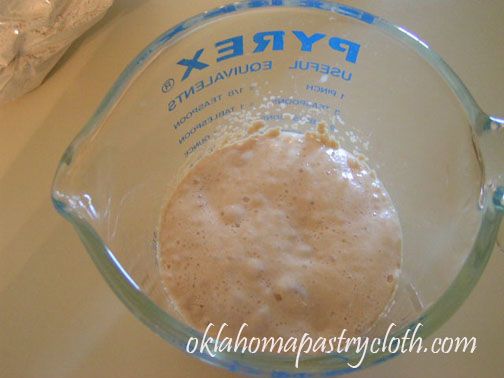
Sprinkle yeast over the surface of the 3/4 cups warm water and allow to “proof” or dissolve in the water and bubbling to the top.

In a mixer with a dough hook, place starter, honey or sugar and yeast water along with one cup of flour, salt, enhancer and soda. Mix to blend.

Dough enhancer can be purchased at Sonrise Grains
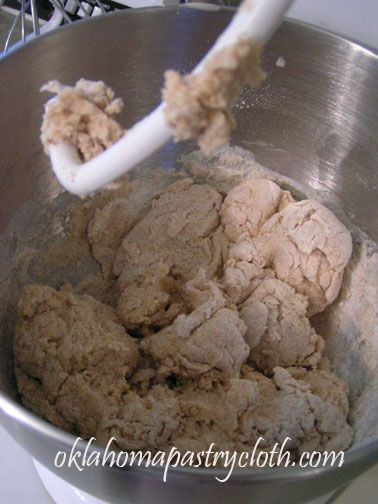
Gradually add second cup of flour. Continue mixing. Add third cup in stages because you may not need all of it. The thickness of your starter will determine how much flour you use. Your dough should pull away from the sides of the bowl. If it does not, add more flour. If it appears too dry, you may add a little more water. This picture shows the dough too dry.
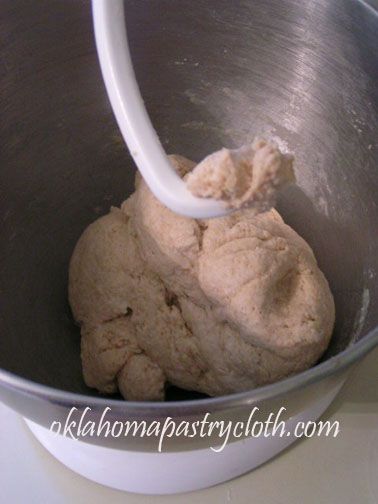
This is better
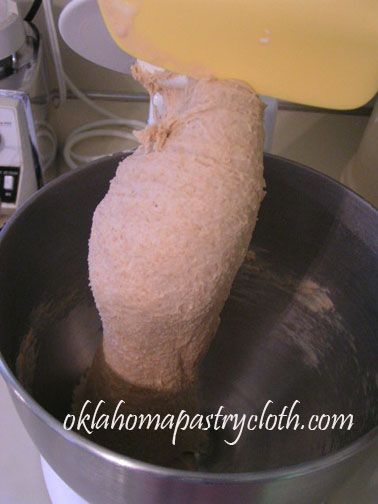
Using the dough hook on low speed, knead the dough for 8-10 minutes. It should be smooth and easily formed into a ball.
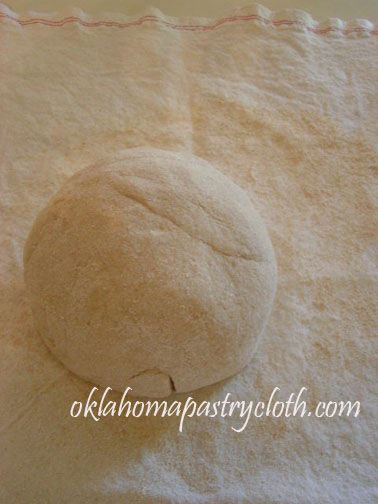
Put the dough out onto the Oklahoma Pastry Cloth™ and form into a ball. Wrap in plastic wrap and allow to rest for 10 minutes.
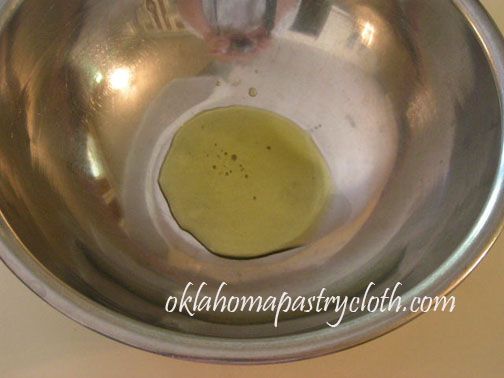

In a bowl, pour a tablespoon of olive oil into the bottom and place the dough, topside down, into the oil. Turn right side up to coat the dough ball in oil.
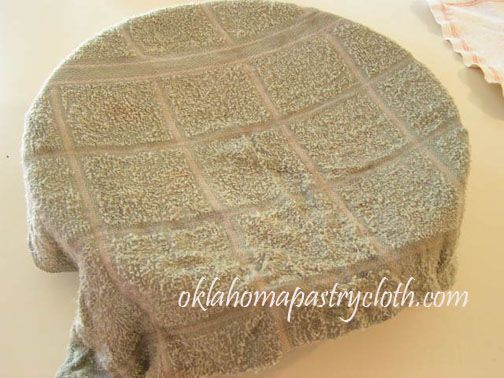
Cover with a warm, damp towel and allow to rise until doubled. If not adding yeast, allow to rise in a bowl that is covered with a wet towel and then covered in plastic wrap. Rise for anywhere from 8 -12 hours until doubled. The longer the rise, the stronger the flavor.
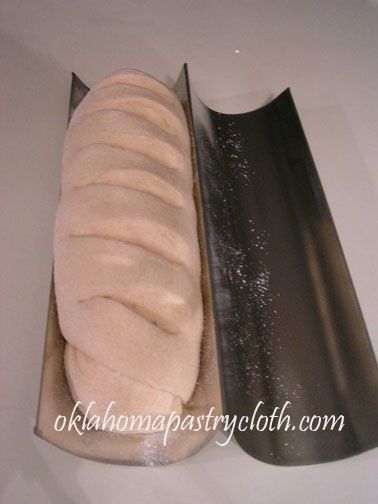
When risen, punch the dough down and put out onto pastry cloth and pat out to 1 inch thick. (If not using yeast, knead in a little flour.) With oil on your hands, wipe the dough with oil and then begin rolling toward you like a jelly roll, firmly pressing the edges into the dough. Continually oiling your hands, continue rolling until loaf is created. Tuck ends under. On a cookie sheet or Italian loaf pan, oil the pan and sprinkle with corn meal. Place loaf onto cookie sheet or into pan and cut diagonally with scissors to make slashes. Cover with warm, wet towel and let rise until double. (If not using yeast in the recipe, cover with towel and spray water mist onto the towel occassionally to keep it moist as it rises for 1 to 4 more hours.)
Preheat oven to 400 degrees. Spray the bread with a mist of cold water before placing into oven and then bake for 20 minutes until browned. Turn bread over in the Italian loaf pan and bake 4 minutes longer to brown bottom.

Remove from oven and cool on rack. While hot, you can brush melted butter over the bread. Cover bread with towel as it cools for 30 minutes to make the crust soft yet crunchy.

Slice and serve. And it IS good with jam and tea!!

 Homestead Revival
 Paratus Familia
 Rural Revolution