 Seems like blueberries have come in everywhere and it appears to me that there was a really good crop. That is one bit of produce that flourished here at the Oklahoma Pastry Cloth™ digs. Neither frost nor drought seemed to have an impact and so I have happily frozen boatloads of blueberries. I always freeze my blueberries when they first start coming in because I never have enough to can right off the bat. I can them after I have enough, even after having been frozen. Also, this gives me some flexibility on when I can my blueberries, putting them on the back burner behind the veggies that have to be processed immediately. So today I decided it was time to do the blueberries. I usually leave a couple of gallons in the freezer for pancakes, waffles, scones and yogurt, but I can the rest for blueberry muffins. Yummy blueberry muffins. I know this sounds crazy, but I would rather use canned blueberries for my muffins than fresh or frozen. For some reason, the canned makes muffins light on the inside and crunchy on the outside, and they just color those muffins the prettiest blue! I can my blueberries in two sizes of jars – half pint and pint – since there are just two of us. I use the raw pack method with a very light, thin syrup that hasn’t much sugar and drain it from the berries when making muffins. This leftover syrup gets turned into a light blueberry syrup for pancakes by adding pancake syrup and boiling hard for one minute. You can also can blueberries by putting them into a piece of cheese cloth and dipping them into boiling water until you see blue juice, packing them into jars immediately. However, that method is messy, messy, messy. Yes. It makes prettier jars, but, heh, I’m not eatin’ ‘pretty’. Before starting run your jars through the dishwasher to sanitize or boil them and allow to dry upside down.  Add 2 cups of sugar to 5 cups of water. Stir to dissolve  Bring water and sugar mixture to a rolling boil and boil for 5 minutes. Set aside.  Use either fresh or frozen blueberries. I know that it doesn’t look these are frozen, but they are!  Place blueberries into the jars, leaving a 1/2″ headspace. Ladle the syrup over the blueberries, again leaving a 1/2″ headspace. Use a canning spatula or butter knife to run around the inside perimeter of the jars to remove any air bubbles.  Wipe the rims of the jars with a warm, soapy dish cloth to remove any syrup that may have splattered onto the jars.  Add lids that have been warming in water to the jars and attach rings, tightening and then backing off just a smidge.  Place the jars into the canner and lower into water that should submerge the jars with at least 1″ of covering the top of the jars. Bring to a rolling boil and begin timing to process for 10 minutes.  When the time is up, lift rack of jars to rest on the side of the canner and remove jars with canning tongs. Allow to cool. The lids will pop as they seal. The light makes these look red, but they are really blue!  OK..now for the blueberry muffins. I use the recipe that I posted for Strawberry Muffins only I use drained, canned blueberries. They are even better than the strawberries! Go check out the recipe! |
|
Oklahoma Pastry Cloth™ Company on Facebook
|
 |
Archive for the ‘Canning and Food Processing’ Category
Canning Blueberries
Thursday, July 21st, 2011
Canning Beef Stew
Tuesday, July 12th, 2011
 How hot is it? It is so hot in Oklahoma the snakes are looking for air conditioning and they’re cold blooded!! It so hot here that the nectarines are going straight from the tree into jars as jam. It’s so hot that the Gila Monsters have moved to Oklahoma from the Mohave Desert because it’s warmer here! Yeah, we’re setting records. The disturbing news for the rest of you is what this is doing to part of your food supply. Grain and cotton crops have simply burned up, causing both to rise in price. As a result, grain is becoming cost prohibitive for ranchers for their livestock. Grass is gone and so many ranchers are having to resort to expensive hay as well. I just talked with a friend, in south-central Oklahoma, who owns a very large cattle ranch and she said they are preparing to sell their entire herd of cows. She said the cows are losing weight so fast that they must be sold this week or she and her family will take an even worse beating. There is no grass and there is no water. I see cheap beef in the grocery stores in the shortrun, from ranchers selling off herds, and a shortage of beef/high prices in the longrun, so plan accordingly!! One would think that in this furnace that is the midwest, one wouldn’t even think of hot meals. But planning ahead is the stuff that makes us prairie folk able to contend with the unexpected. Using garden staples that have managed to survive to can foods for the winter is a great way to use these days indoors. I have been finding beef on sale and so, I’ve been putting up a Fall and Winter supply of beef stew, a veritable meal in a jar! Just open a jar, heat the stew in a pot, mix up a batch of cornbread and you’ve got supper! And if the electricty goes out in one of our famous ice storms, the wood stove or the grill make perfect heat sources for a pot of stew accompanied by bread or crackers. So here is how I do my beef stew for Mr. Fix-It. He loves having this around because he can fix it himself! (carrots, celery, potatoes, onion, etc)
 Pat 10 lbs of meat dry with paper towel. I use either chuck roast or rump roast, depending on what’s on sale. Today I’m using chuck roast.  This is a rump roast. If you will notice, the chuck roast has more fat and more loss, but it is also more flaky.  Cut meat into cubes  Remove fat and membranes by lifting as you cut underneath. As you lift, this gives more area to slice under the membrane or fat and also helps to release them from the meat.  Lightly salt the meat  Add a little of the meat at a time to a very large stock pot that is on medium heat. Brown and add more meat until most meat cubes are lightly browned on at least one side. Juices will begin releasing.  Add 4 1/2 pounds of mixed veggies. I am using potatoes, carrots, onions and celery. You can use whatever amounts of each that you prefer and you can add other vegetables according to taste.  Add water to cover  Add garlic powder  Add thyme  Add bay leaf  Add beef bouillon  Mix package of brown gravy with 1/2 cup water and add to the stew, stirring. At this point, if you like wine or burgandy in your beef stew, add 1/2 cup. Mr. Fix-It likes his without.  Cover and allow to simmer vigorously 1 hour, adding water to keep at the same level and stirring occassionally to keep from sticking.  Mix 1/2 cup corn starch with one cup of cold water. I start out with this much and add more if I need more thickening. I usually wind up using 3/4 cup corn starch with 1 1/2 cup water, however, I like to start out with less and adding more if needed. Do not make the broth too thick. It can always be reduced after opening a jar and bringing to a boil. If you get your broth too thick, it will thicken more in the processing and will become way too thick.  Stir continually as you pour into boiling stew broth to keep from lumping.  Find and remove bay leaf. Place stew into jars, dividing broth evenly between jars. Leave 1″ headspace.  Using a canning spatula or knife, remove any air bubbles by running around the inside perimeter of the jars.  Wipe the rims of the jars to remove any juices or oils  Add lids that have been warming in a pan of nearly boiling water  Add rings, tightening and then backing off just a hair  Place jars into canner, cover and process for 1 hour 30 minutes for quarts and 1 hour 15 minutes for pints at 10 lbs of pressure  Meanwhile, place all the trimmings into a pot and cover with water. Boil until trimmings are cooked down to very tender, continually adding water as needed. Strain broth from the trimmings and add broth to pint jars. Add 1/2 tsp salt to each pint and process with any extra jars of beef stew to make canned beef broth.  Place trimmings, a carrot and about 1/4 cup oatmeal into food processor or blender and turn into a puree. You can put this into jars too, with extra water, leaving 1 inch of head space to can. Or you can freeze it. Use it as canned dog food! Nothing has been wasted. |
|
Oklahoma Pastry Cloth™ Company on Facebook
|
 |
Canning Ham
Monday, July 4th, 2011
|
When I was a child, I remember going to my grandmother’s and granddad’s house and it just seems like everytime we visited, one meal always consisted of a very large baked ham. I hated that dinner (sorry Grandmother) because the gargantuan ham had rings of pineapple stuck strategically all over the skin, along with whole cloves that dotted the entire ham. Bleahh. And of course, it was accompanied by canned peas. Oh my. How I hated canned peas. To this day, I will not eat a pea if it is from a can. Give me fresh or frozen or even in a soup, but not on my plate as a mushy, squishy, round, green thing. You know what’s even ten million times worse? Creamed peas made with a white sauce and canned peas. They are the very picture of the pun of Miss America’s desire for “Whirled Peas”. My memory still nurtures a picture of a 14 year old me, sitting all by myself, at my grandparents’ dinner table with an all but empty plate – empty except for a pile of peas. My grandfather watched until I choked down the last pea, and then allowed me to leave the table. I wonder to this day where my parents were. Maybe they were secretly in on the plan to force me to like this canned excuse for a legume. Well, I showed them. I still hate ’em!! But back to the ham. I have never understood why anyone would want to mess with the simple and delectable flavor of a smoked, fully cooked ham – the kind that comes in that thick, plastic package, surrounded by a cloudy brine and sold as whole, shank or butt. I know, some people pour Coca Cola over theirs, and others use pineapple juice with brown sugar or some such syrup, but I am a purist. I want my ham as ham. If I want a sweet sauce, I’ll dip the ham in it as I eat. Just give me plain ol’ baked ham. The beauty of leaving a ham in the buff is that after serving it for a meal, you can process the rest in jars to have later on. I try to can ham twice a year – once for winter and once for summer. It is wonderful for ham salad, for omelettes, for eggs benedict, for casseroles and just as a side for eggs and biscuits or for dinner. I buy ham on sale and freeze it until I am ready to bake it, serve it and then can it. Tonight I did just that. I baked a 10 1/2 lb shank ham, served it with green beans and a wonderful hash brown casserole that I will post later. I bake my hams in brown-in bags which makes the cooking go faster. Baked at 325º, I usually average about 20 minutes per pound. Below, you’ll find how I then can the leftovers.  When using a brown-in bag to bake a ham, shake about 2 tbsps of flour inside the bag, place the ham ino the bag and then cut a 1″ slice into the plastic to allow steam to escape,  After 3 1/2 hours at 325º, this ham is succulent served with green beans and cheesy hashbrowns.  Once we’ve eaten, I take all of the meat off of the bone. When cooked in the brown-in bag, the meat just literally falls into your hand. Not much cutting required. And the beauty of it is that the fat falls off as well, so that you get very lean pieces.  The ham is placed into pint jars to about 3/4″ head space and the ham bone is frozen in a freezer bag for later use in a huge pot of pinto or navy beans. The juices can be evenly divided between the jars of meat or left out completely. The juices will darken the ham a little bit. Notice that in the bowl, all that is left is some fat, some skin and the plastic bag.   Boiling water fills the jars to within 1″ of the top of the jar rim  Using a knife or canning spatula, release air bubbles by forcing the utensil around the sides of the jars  Wipe the rims of the jars with a warm, wet, soapy dishcloth. This is very important because the grease from the ham can splash onto the rim and keep the lids from sealing in processing.  Have the lids ready in water that has been brought to a near boil. I like to place my lids alternating rubber ring up – rubber ring down, so that the lids do not stick to each other.  Using a canning wand or tongs, place lids onto jars and add rings. Tighten and then just barely back off the ring (loosen) You want the ring on tight, but not too tight.  Different canners require different numbers of quarts of water, but I use the rule of thumb of 2″ of warm water in the bottom of the canner.  Place the jars into the canner base making sure that there is space between them. Put lid in place. Process on 10 lbs for and hour and 15 minutes (75 minutes) for pints and and an hour and a half (90 minutes) for quarts.  Once the jars have cooled, wash the rings and jars in hot, soapy water to remove any oils. Dry and then replace rings when they are totally dry.  The jar on the left has been canned with the juices and boiling water and is still warm. When it cools, the fat will separate to the top as in the jar to the right. The jar to the right has been canned with just boiling water. I’ll be posting some recipes for you to use with your canned ham. |
|
Oklahoma Pastry Cloth™ Company on Facebook
|
 |
Canning Peach Pie Filling
Tuesday, June 28th, 2011
 There is just something about the smell and taste of peaches. The smell is great in potpourri. The smell and taste are awesome in iced tea and are especially good in our Peach Cordial and Peach Berry teas. Peaches just have a heady fragrance that even draws you to the grocery bins with an invisible wave that says, “You HAVE to have some peaches!” We only have one peach tree. But more are going to be planted this fall. It is best to have at least two different kinds of trees – and we did – but one died. Oklahoma has many peach orchards, but the heat is brutal and it got our other tree. Actually, one tree is plenty for one family, but as I said, two make for better fruit. I was very excited to see all the fruit on our tree this year. It got bigger and bigger and then one day we noticed little, clear sappy things oozing from tiny holes. Arrggghhh. Oriental Fruit Moths had had their way with my peaches!!! How depressing. These beautiful fruits look so pretty, but when sliced, brown tunnels weave through the ripe and juicy meat. So, next year, pheromone traps will be hanging from the tree like Christmas ornaments! What fruit we did get has been incredible. It’s like eating peach candy and so I have been diligent at getting these precious peaches stashed away for future use. One thing I love to do is make pie filling. I use the same method as my Apple Pie Filling, but I adjust the syrup for peaches – a litle thinner. The following is the recipe that I use for peaches. To see how to make the syrup just click on the link for the Apple Pie Filling and directions and pictures are there. Mix dry ingredients together in a large pot and slowly add water, stirring with a whisk until well blended. Bring to a boil while continually stirring and allow to boil until mixture thickens and becomes more transparent. Remove from heat and add lemon juice. Stir.  Wash 6 – 8 pounds of peaches. In this case, I used more because I had to cut so much off of each peach due to those nasty Oriental Fruit Moths.  Peel peaches  I find the easiest way to slice peaches is to make cuts about 1/2″ apart, cutting at an angle toward the pit so that there is very little meat being pulled away from the pit. In the case of most of my peaches, I ended up cutting out chunks around the worm holes so this batch isn’t very pretty!! I slice my peaches into a bowl that has a cup of water mixed with a tsp of FruitFresh in it. I continually toss the peach slices as I cut to keep them coated with the citric acid mixture.  Pack the peaches into jars leaving a 1″ head space from the top of the jar. I’ll be rearranging peaches from the jar on the front right to distribute among other jars because it is too full. Add 1/2 tsp apple cider vinegar to each jar of peaches.  Ladle syrup into jars leaving a 1″ head space of syrup. This prevents any from boiling out in the processing. I usually have around a quart of syrup left over and just use it for my next run or I can it and use it for fresh peaches in a pie.  Using a knife or canning spatula, run around the inside perimeter of the jars to release any air bubbles.  Wipe the rims of the jars with a wet cloth to remove any juices, oils or syrup which will keep a jar from sealing.  I like to place my lids in the water in a pan by alternating them rubber side up, rubber side down which helps to keep them from sticking together. The water is brought to just before a boil and then turned on low to keep the lids warm.  Using a canning wand or tongs, remove the lids from the water and place onto jars. Screw on the rings and adjust by tightening and then backing off just a smidge. Place in a water bath canner and fill with warm water to 1″ over the top of the jars. Bring to a full boil and boil for 20 minutes. Remove jars from canner and allow to cool. Listen for the “ping” pop that lets you know the jars are sealing.  These jars are ready to store. I will use one quart and one pint to make a pie, so this batch made enough for four pies! Just pour into your crust, top and bake at 400 degrees. Easy as…umm…peach pie!! |
|
Oklahoma Pastry Cloth™ Company on Facebook
|
 |
Processing Onions for Long-term Storage
Monday, June 13th, 2011
|
I love onions. Such a mundane little vegetable – but it has such a pleasant shape and flavor, especially the Vidalia variety. Georgia has a right to be proud of that little onion. There is no onion sweeter and you can eat it like an apple – if you like onion flavored apples, I guess! Personally, I think the onion is a necessity in cooking because it makes all the difference in the world…well…second only to tons of garlic. I bet you’d love to have an up close and personal conversation with us at the OPC™ digs, eh? Onions are one of the simplest veggies to put in a garden. Cheap too! A bundle of onions costs around $1.50 to $4 and offers you anywhere from 50 to 100 sets. I usually put out two or three bundles. Row furrows are dug, fertilizer is sprinkled down the center of the furrows and then chopped in and covered to make a raised row. I plant my onions using a stick in one hand to make a hole and then dropping an onion set with the other hand. I then go back and pull the dirt up around each set using both hands (yes, I wear gardening gloves) which also straightens the onions to standing. In my neck of the woods, I have to plant them deeper than usual because our soil is a sandy loam and dries out really fast in our stiff winds. Once the onions are established, I pull the dirt away from them to expose the top of the bulb. Turning the soil between rows can be done by using a hoe, a mantis or a tiller or mulch can be used as well. This year, we had a dickens of a time keeping a really weird grass in check. Hand weeding around each bulb was a not fun necessity, but this has been an unusual year. The only other maintenance that we perform on our growing onions is pinching off any seed heads if they form and a side dress of 10/20/10 fertilizer every three weeks if there has been much rain. Otherwse, a series of soaker hoses does the trick. The nice thing about onions is that you can pick them at any stage of the game. Small onions are great for salads and garnish as ‘green onions’. Medium sized onions are wonderful to throw in with green beans or pintos or they can be left to expand to slicing size.  At the later stage of growth, onions have the soil pulled away from the bulb to allow the bulb free room to grow.  Eventually, the green tops start to fall over.  After the tops fall over, the onions are left for about two weeks before pulling.  Onions are easy to pull out of the ground.  We use 5 gallon buckets to gather our onions. Makes for easy carrying.  I wash my onions a few at a time in a big stainless tub/bowl or in another large bucket. After cutting off green tops no closer than 1 1/2″ from the bulb, I submerge the bulbs in water and use my hand to wash them back and forth.  I separate out sizes of bulbs and freeze the smallest ones for seasoning beans, etc. or cut them up for dehydrating. These I prepare, after washing, by removing the roots, the stem and the outer skin.  The medium to large ones are left whole to cure on racks for use as fresh onions. The roots and the stem will dry up and will be clipped. These onions will stay fresh until as long as November or December, stored in a cool dark place.  The largest are sliced and frozen on cookie sheets covered with wax paper and will be put into freezer bags. These will be used for homemade onion rings, for cooking on the grill and for use in casseroles.  Onions for dehydrating are chopped by hand because the food processor makes the pieces too small. The chopped onion is spead out on dehydrator racks. I start the process outside because the smell is overpowering and keeps you from crying. 🙂 After about 6 hours, I move the dehydrator inside.  After drying about 15 to 18 hours, depending on the moisture content, these onions are packaged into jars. Here, I have dried some of both our yellow and white onions. Storage for these dried onions is years. They are wonderful for using in soups and stews but you can also use them in chicken or tuna salad or for seasoning a cooking hamburger by putting a tablespoon or two into a bowl, covering with water and then placing into the frig overnight. You will have rehydrated onions to use like fresh! That is actually what some restaurants do. |
|
Oklahoma Pastry Cloth™ Company on Facebook
|
 |
Home-Cured Ham
Friday, May 20th, 2011

 The unique feature of country ham is the layer of mold that forms on the wrapping paper and ham surface as it hangs and ages. Newbies who receive a Tennessee Country Ham for a gift usually freak when they unbag their present and then unwrap the paper that has shrouded the meat all during the curing process. A nice, moldy carpet coats portions of the rind and paper. This is simply removed by scrubbing the ham with a mixture of vinegar and water or with plain water and a stiff bristle brush. The meat is sliced with a saw just 1/4″ thick. Having worked in a meat department that was constantly visited by local farmers toting their treasured cured hams to be sliced, I learned that it was ‘bragging rights’ when it came to how long one of these hams were hung. Three years was the limit, but it seemed that the more mold and the longer aged the better these ‘specialists’ viewed their product. Hog killing commenced around Thanksgiving, hams, bacon and shoulders were cured and smokehouses were loaded with the goodies to be smoked or to be used without smoking. I remember one farmer’s story about a most disastrous year. He had corn fed and slaughtered his pigs to put up meat for the year. After a gruelling day of salting down, wrapping and hanging portions, cutting up roasts, chops, ribs and other cuts for the freezer, grinding sausage and rendering lard, this industrious man and his family went to bed and slept the sleep of hard workers. The family went about the rest of the year and on into winter with the happy knowledge that come Fall, there would be good eatin’s from the smokehouse for sure. Sometime during the summer, the farmer went to the smokehouse and opened the door. To his horror, all that he found hanging from the rafters were bones tied with rope and picked totally clean of any shred of meat. Rats had crawled along the rafters, shinnied down the ropes and feasted on the cured meats without so much as asking! In the meat department, we cured hams all year long. We purchased fresh hams from our local packing plant, which you can do as well. We let them warm at room temperature for a couple of hours and then coated with our cure, hanging them in the cooler for the first 12 weeks. As meat begins to cure, it must be kept cool. This is why the farmers always waited until Thanksgiving or later to kill their hogs. With a walk-in cooler or refrigerator, however, the curing process can take place any time of the year.  I thought that I would give you a step-by-step lesson on how to create these wonderful hams with the help of some great kids. A group of home schooled students got to mix an anatomy and physiology class with learning to cure meat at the Oklahoma Pastry Cloth™ digs. We had purchased a hog that was taken to our local packing house and then we picked up the quarters to process ourselves, including curing the hams. As you will see, curing meat is a pretty simple process and is a wonderful way to preserve meats for a long time. One note, however, once these hams are sliced, the meat must be wrapped in freezer paper and frozen or, if eaten soon after slicing, kept in the refrigerator for a short time.
           So there you have it!! |
|
Oklahoma Pastry Cloth™ Company on Facebook
|
 |
Dehydrating Mushrooms
Tuesday, May 17th, 2011
Dehydrating Part IV Our local Aldi’s had a sale. And what a sale. Mushrooms were 69 cents for an 8 oz box! Can you believe it? And they were beautiful. So what is a sale junkie to do? Well, dehydrate them, of course!! There’s nothing like having dehydrated mushrooms at your fingertips for soups, spaghetti sauce and even to put on top of steak, sautéed with onions and green peppers! Mushrooms are easy to rehydrate and only require covering with water, to be placed in the frig overnight, or for quick rehydration, by covering with hot water and allowing to sit for an hour or so. Canned mushrooms are great, but to me, the dried ones keep more of the original mushroom flavor and consistency than canned. So, of course, I loaded up on mushrooms and trotted home with my prize. This past weekend, I set to the task of getting them dried.      |
|
Oklahoma Pastry Cloth™ Company on Facebook
|
 |
Days of Strawberry Jam
Wednesday, May 11th, 2011
 Despite the drought-like conditions that Oklahoma has experienced this year, and in spite of the bitterly cold and snowy winter that attacked the state, the strawberries are showing how truly resilient they really are. We did lose some plants, but the ones that survived have rallied with a gumption. The plants and the berries are really large this year and drippy sweet. The varieties are Cardinal and Ozark . I’ve spent several days making jam and just thought I’d show the process for those who have never done it. I always go straight by the recipe for cooked jams in the Ball fruit pectin box. I like Ball fruit pectin better than SureJell but that’s just my personal preference. Be sure to have your waterbath canner ready, jars washed, sterilized and warm and lids sitting in warm water before you start. The jam goes pretty fast.               |
|
Oklahoma Pastry Cloth™ Company on Facebook
|
 |
A New Generation of Canners!
Tuesday, April 19th, 2011
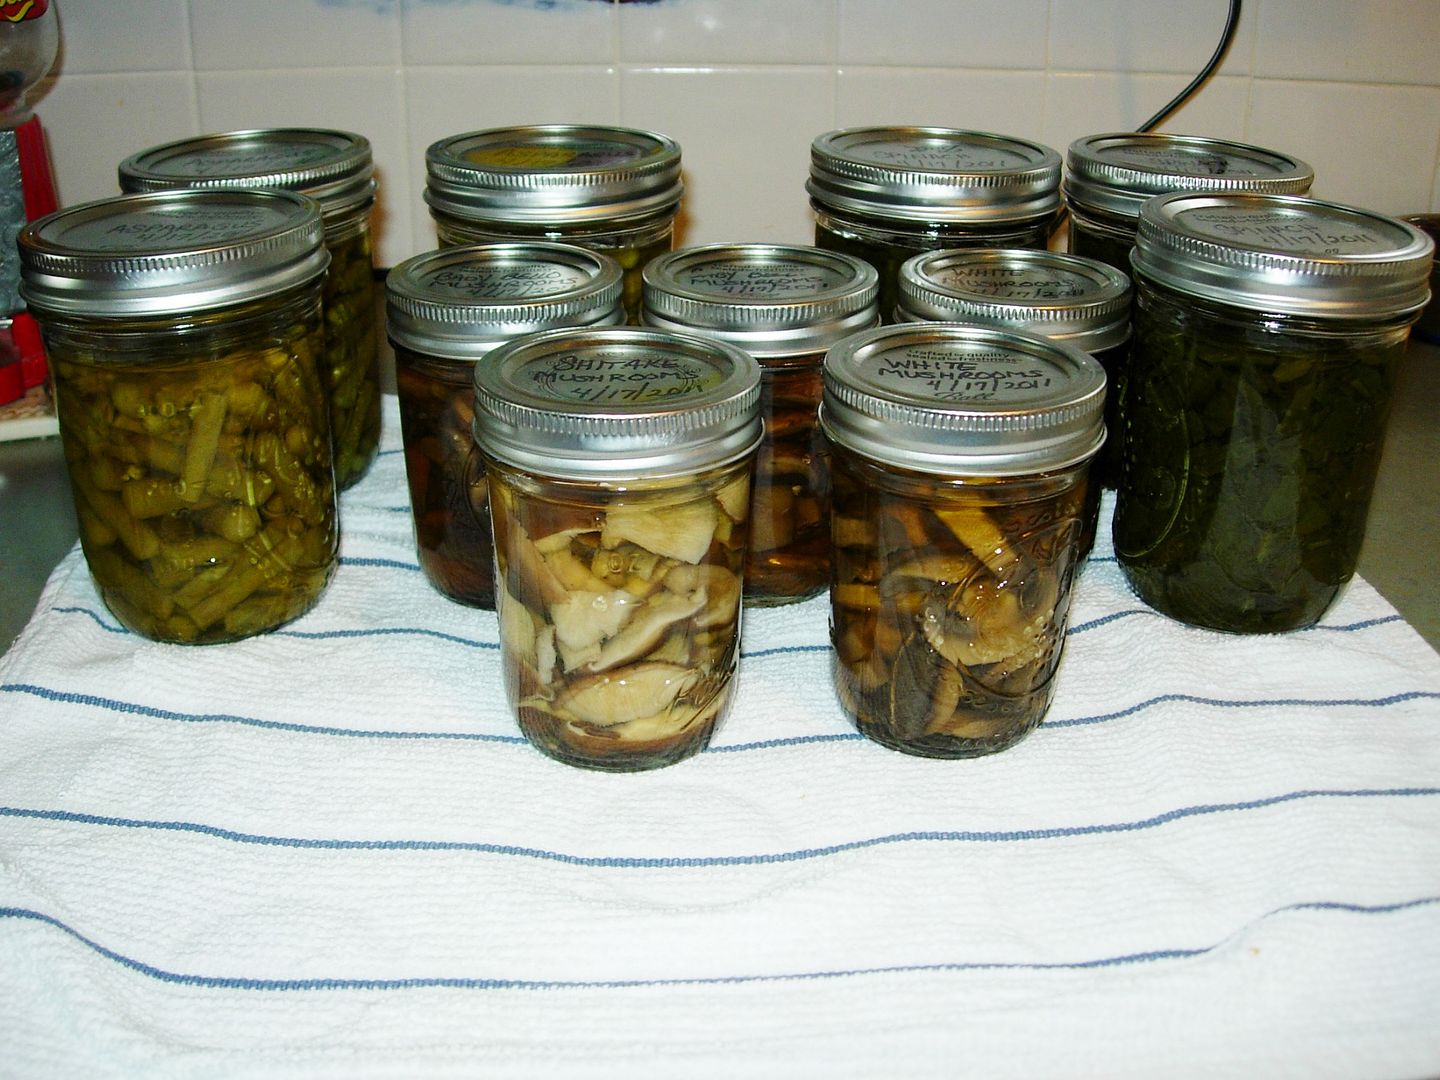 It is always exciting to hear from a reader who has jumped with both feet into the wacky world of canning! I love to hear the stories and see the results because it is wonderful to know that the art is being passed on. As I hear the excitement in the notes attached to photos, it takes me back to my early days of canning with visions of my first little kitchen, its unfinished concrete floor, boxes of bottle lambs in the corner and my brand, spankin’ new pressure canner gleaming on the stove. That was a long time ago. I received this photo from reader, Carol, who really took on some unusual produce to attempt her first experience in pressure canning. She wrote the following: “The farmer’s market started last Saturday and bought some nice fresh asparagus and spinach and had some mushrooms from the grocery. I took my pressure cooker for a test drive then I commenced to canning! 3 pints of asparagus, 3 pints of spinach, 4 1/2 pints of mushrooms. I am so excited. I have always wanted to do this. ( I know, I need to get a life) I have never canned or used a pressure cooker before. My family is terrified of pressure cookers after my Grandma exploded one while cooking stew and for years they found splats of stew around they kitchen and it took forever to get it all off the ceiling…” So I am offering a “congratulations!!!” to Carol for overcoming the family phobia and successfully processing some really unique items! 🙂 Yay! |
|
Oklahoma Pastry Cloth™ Company on Facebook
|
 |



 Homestead Revival
 Paratus Familia
 Rural Revolution