 It’s getting colder in Oklahoma. Smoke is starting to waft from fireplace and wood stove chimneys and the sound of football games is filling our weekends. For me, it means racing (I am a turtle) from the car into the aquatic center, freezing in short pants and shirt over swimsuit, to spend an hour huffing and puffing at AquaDance in 8 feet of water, never touching the side or bottom of the pool for the entire workout. Then, I get to head back out to the car, as fast as I can hobble on a bad ankle and knee, wet and open to pneumonia!! My participation in AquaDance is supposed to convince the health insurance company that I value their admonitions to exercise and to make them feel terrible when I drown from exhaustion. But they won’t care. I don’t think they really care if I exercise. They just like to look down their noses at us regular folk and chide us for everything in life that makes life fun….like sitting in a movie theater with an extra large box of buttered popcorn, extra butter, watching a movie instead of treading water for an hour. Actually, I love AquaDance. I can’t wait for every workout. I feel like a fish and for that short amount of time IF the water is warm (and that can be a big IF) my joints are free to separate through gravity and suspension in the water, giving me amazing relief from pain after my disastrous fall at the post office 5 years ago. Yes, I did. Broke my ankle and both feet. But that’s another story. Unfortunately, while my swimming does burn hundreds and hundreds of calories, I have a tendency to replace every, last, one of them with comfort food. Oh yes, in the South we do love our comfort food. I thought I’d share my recipe for Fettuccine Alfredo that I promise is going to have you hugging yourself and speaking Italian after the first bite. A small amount goes a long way because it is rich and creamy and filling. You can use store bought noodles, but I strongly encourage you to make your own from my family recipe. They are not hard to make at all. I sure hope you enjoy this!! And you might want to think about joining a pool to work off the dinner. 2 recipes of Hightower Noodles 1 cup real butter 1 1/2 cup heavy whipping cream (you CAN use 1/2 & 1/2 but it’s not quite the same) 1/4 tsp salt 1/4 tsp pepper 1/2 tsp garlic powder 3/4 cup grated Asiago Cheese 1/2 cup grated Parmesan Cheese Juice of 1/2 Large Lemon Meat and Veggies of your choice DIRECTIONS: 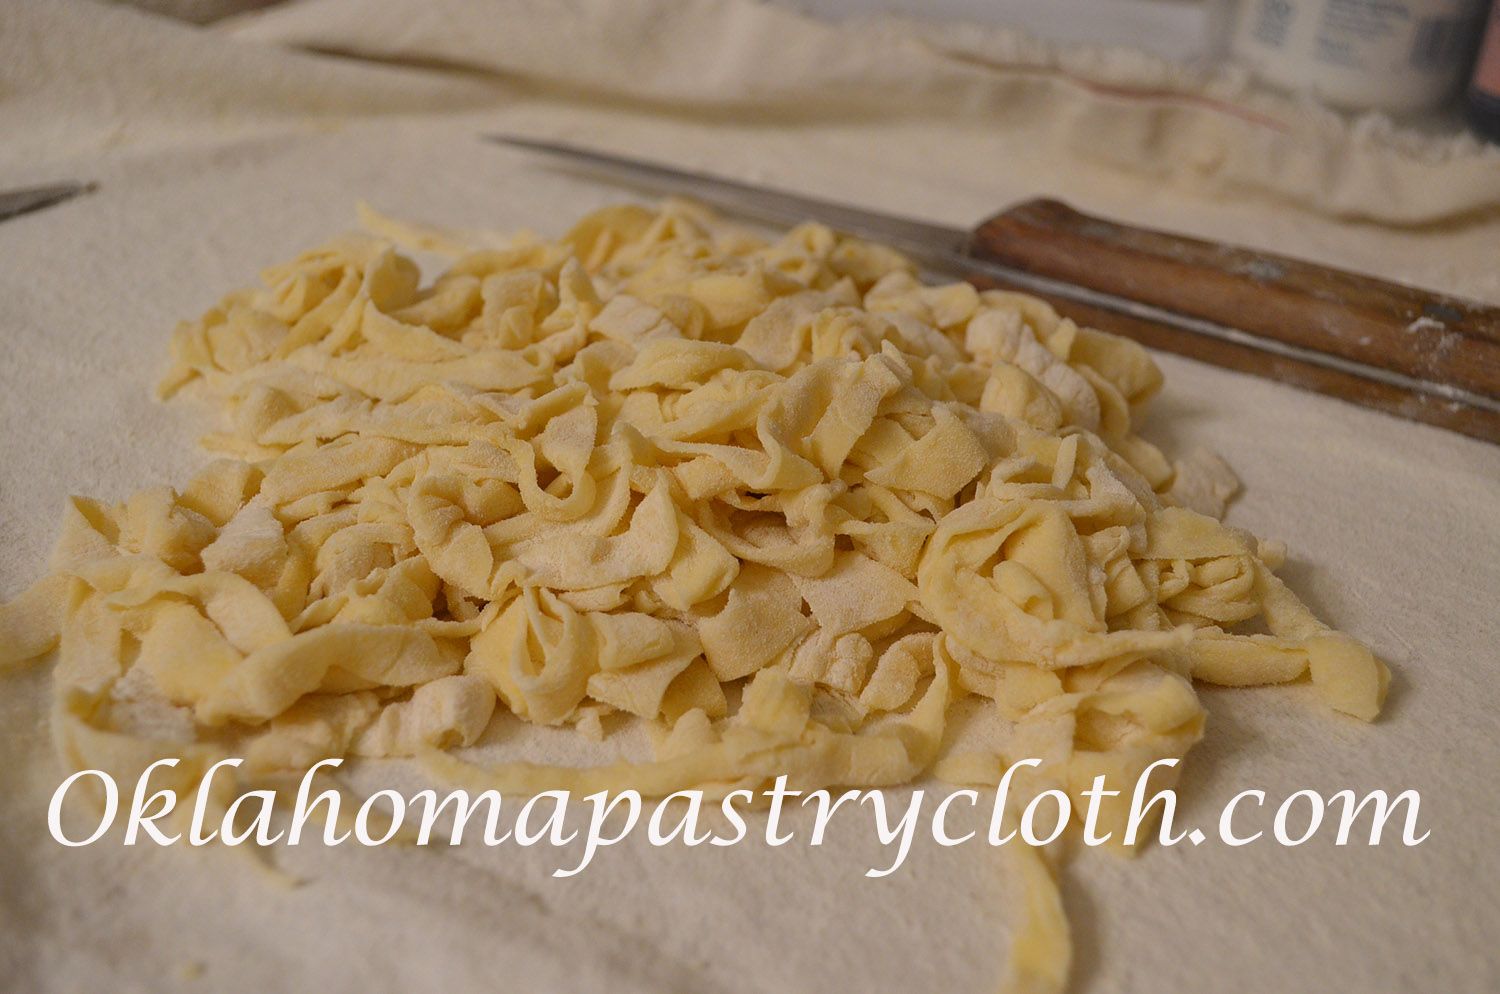 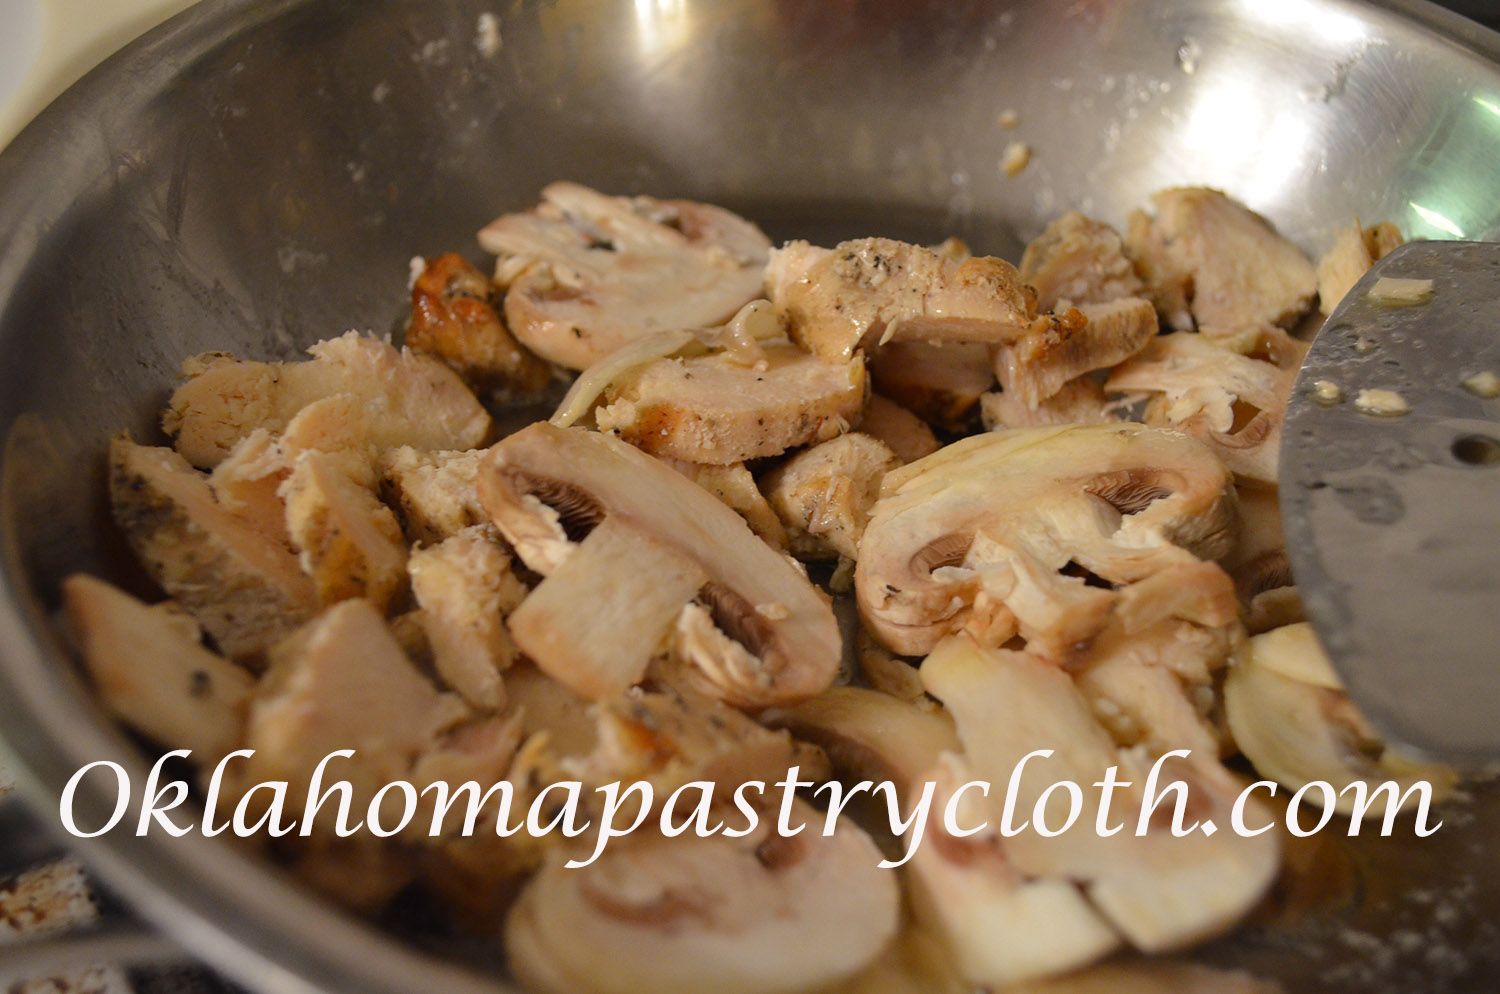  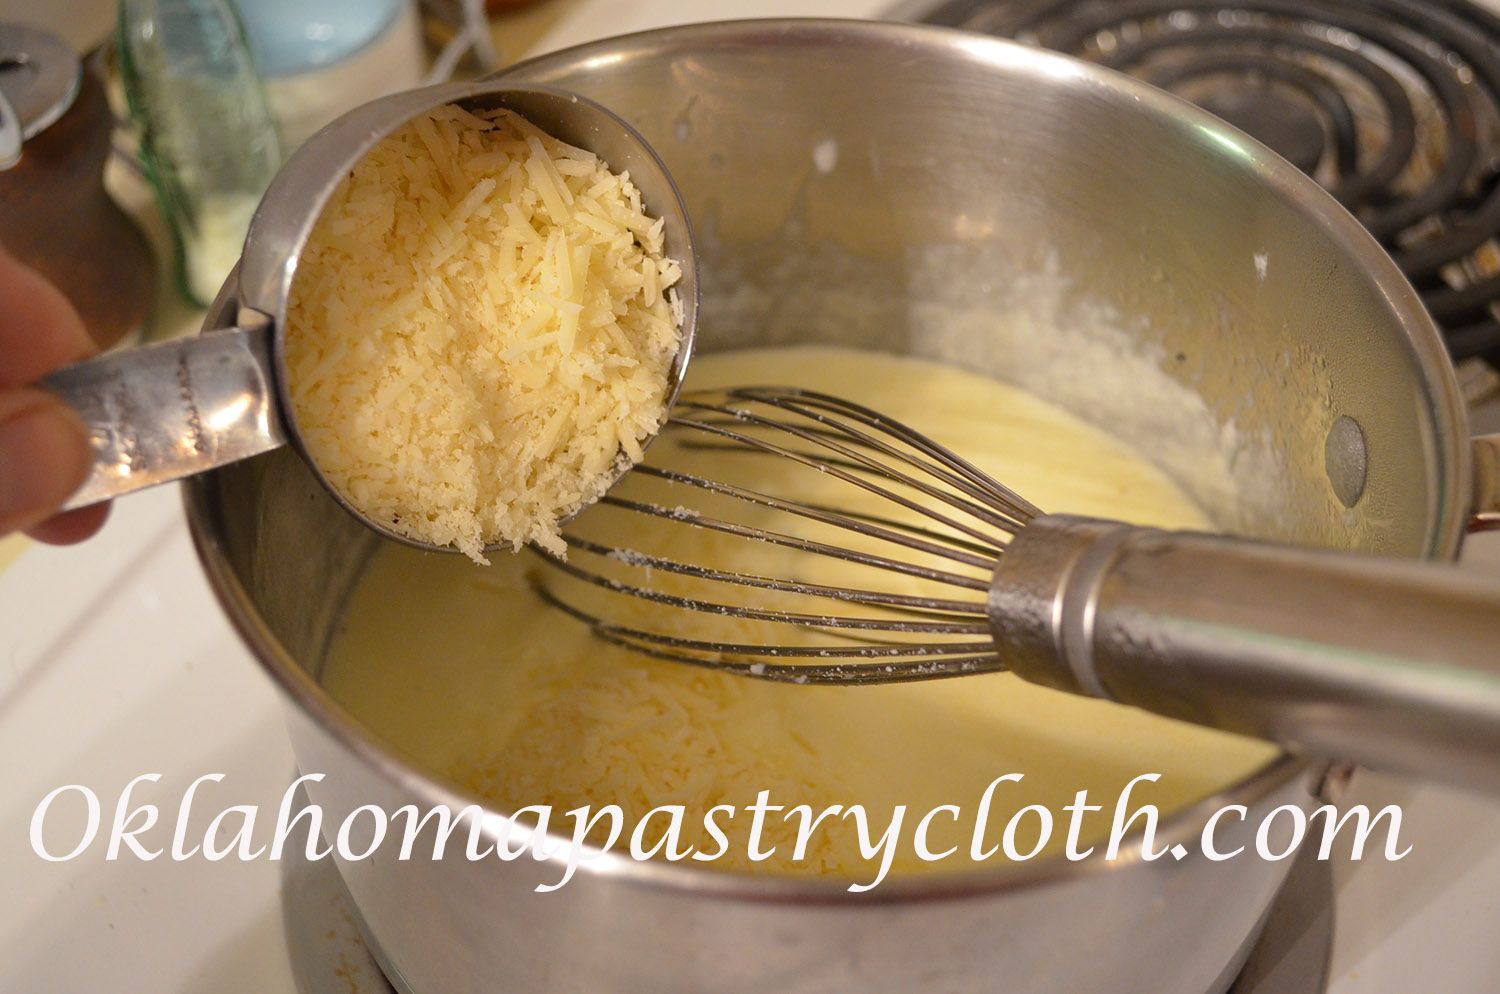      |
|
| |
|
Oklahoma Pastry Cloth™ Company on Facebook
|
Fettuccine Alfredo with Homemade Noodles
October 17th, 2018
Ranch Style Eggs
August 14th, 2017
|
The Ranch, But…..   The beauty of living in Oklahoma is all of the different kinds of foods found across the state. Meals are impacted by the influences of the early pioneer and by the German influence and the Polish influence and the Swedish influence and the Italian influence and the Native American influence and, of course, the Mexican influence. No matter, where you go in the state, depending on the early settlers’ cultural background of the area , the foods are sensational and different. When talking restaurant foods influenced by the Latino culture we have Mexican, Tex/Mex, New Mexico/Mex and American/Mex but “At Home Mex” is a favorite at our home! And since breakfast is our favorite meal, I think that I need to share my own version of Ranch Style Eggs, also known as Huevos Rancheros. They are gooey, cheesy, luscious eggs that will start your day off with a bang or can make you a hit at a potluck brunch with friends. Since our tomatoes are still producing, I use my fresh tomatoes. However, you can use canned tomatoes and they are just as good. The recipe makes three eggs but you can double or triple the recipe into a larger casserole dish and do just fine. Ingredients:
 Saute onions in 1 tbsp olive oil with 1 tbsp melted butter until onions are just clear. Add green peppers and saute.  Add either diced fresh tomatoes  or add canned tomatoes. Stir and simmer.  Add soda and stir. A foam will form and just stir it down. The purpose of the soda is to cut the acid and any bitterness of the tomatoes. Add all of the spices and stir. Cook down until thick – about 20 minutes.  While the tomatoes are simmering, brush tortillas on both sides with olive oil and place into a casserole dish, overlapping to fit.  Evenly distribute the tomato mixture around the tortillas, leaving a well in the center of each tortilla. Make sure that the tomatoes form a circular barrier for the eggs that you will be adding.  Break eggs, one at a time and gently into the center of each tomato well.  Cover the eggs and tomatoes with cheese. I am using crumbled cheese here, but you can use sliced or shredded cheese as well. Bake in a 400º oven for 10 to 20 minutes, depending on how firm you like your eggs. Serve hot with sausage, bacon or ham.  |
|
| |
|
Oklahoma Pastry Cloth™ Company on Facebook
|
|
 |
Cowboy Eggs??
July 24th, 2017
|
It has been so hot in Oklahoma that the birds have turned the bird bath into a hot tub! 103º on Saturday with a heat index of 111º. Finally, yesterday we got a good storm and things have cooled down some. But I have a feeling, not for long. I’m making lots of cool meals on these hot days. Have you ever taken one of those tests where the very first question says to go to the last question and the last question tells you to just answer the last question and stop? How many of you actually did what the test told you to do? Or did you just go through the entire test and answer all the questions and THEN get to the last one? And did you feel like the dolt that you were? Yeah, well. That was me. I was “Miss Answer-All-The-Questions-NOW” dummy – but only the first time. However, it appears that I still have this block about reading directions. Two weeks ago, it was announced at church that we would have a potluck dinner July 23rd – yesterday. In the bulletin was a list that indicated the first letter of last names, divided into food groups. That way, there would be equal amounts of salads, meats, veggies and desserts. So, Saturday night, I was trying to figure out what I could make, right then, that would save me from getting up early on Sunday morning. I settled on Cowboy Caviar – my version. Yes. Cowboy Caviar. That’s what we call it here in Oklahoma. No, cowboys don’t lay eggs, but they can’t afford those expensive fish ones either. So there you go. Cowboy Caviar. I had taken a bunch of recipes for Cowboy Caviar and combined and removed and added to come up with my favorite method. I lovingly toiled over my project and proudly displayed the really large bowl of the tasty stuff to Mr. Fix-It. His comment was, “Isn’t that an awfully lot of Cowboy Caviar?” No. No it wasn’t. It was going to a BAPTIST church potluck lunch. Need I say more? I put the large bowl of ingredients into the frig to marinate overnight and began cleaning up. It was then that the thought crossed my mind that food groups had been assigned. Oh no. Hopefully, W was assigned to salads?? I ran to the computer, pulled up our church website and searched for the list. There is was. W….desserts. Great. And so, I got up at 6 am and threw together my favorite Old Fashioned Chocolate Pie. I grabbed a can of whipped cream, for the pie, and Mr. Fix-It and I transported a hot, chocolate pie – straight out of the oven – with the Cowboy Caviar to church, where I put the pie in the frig to see if I could get it cooled down in time. Long story short, we came home with an empty pie tin and an empty crystal bowl, all of the pie and Cowboy Caviar having been consumed. And then I took a nap. But I thought that I would share my Cowboy Caviar recipe with you because I bet you’d like to have something easy for a potluck dinner or for a great side on one of these really hot evenings.  Caviar Dressing: Directions: In a medium bowl, add all sauce ingredients and whisk until sugar is mostly dissolved. Pour over vegetables and toss well until all of the vegetables are coated. Cover bowl of Cowboy Caviar with plastic wrap and refrigerate 12-24 hours before serving. Serve with tortilla chips. |
|
| |
|
Oklahoma Pastry Cloth™ Company on Facebook
|
|
|
|
|
Easy Individual Turkey Pot Pies
September 21st, 2016
|
It isn’t Fall yet and it’s still hot here in Oklahoma but if the weatherman knows what he is talking about, cool weather is on its way. Shortening days and coming holidays mean lots of full days with not much time to cook on many of them. Planning ahead and making your own, simple freezer meals saves time and money! And what screams, “Simple – Easy – Fast” like pot pies? Pot pies were a treat when I was growing up. We knew that if my parents were going to go out and a babysitter was coming to corral us four girls, it meant pot pies for supper. My favorite has always been turkey. And so, when I finally figured out, “Heh. I can do this myself”, making the buttery meat pies ahead of time for freezing has provided a quick meal in a pinch. So, I am going to share my recipe with you. This is totally my own, original recipe and you can add to it anything you like – carrots, spices, whatever. But I like just plain, ol’ pot pie rather like the simple, English meat pies. If I were going to add anything, it would be a little fresh thyme. But even that is gilding the lily for me. Oh, and you can find the foil pie tins with lids at your grocery store with the other foil baking pans. So here you go: Printable Recipe Instructions: First, make sure that the pie crust mix is cool but not frozen. Mix 3 1/2 cups of Our Pie Crust Mix Recipe with 12-14 Tablespoons of ice water. Using tablespoons, you can add and stir and add and stir to keep from adding too much water. The dough should be a little sticky. Set aside.  Place the rolled crust into one of the aluminum pie tins and gently press it down to fit to the shape of the tin. Press the edges down around the edge of the tin and fill in any spots that are missing dough by cutting off extra and putting a little ice water on the area and then pressing the piece into place.  Fill pie shell with 1 cup of turkey mixture. Pinch off a smaller ball of dough and roll it into about a 6″ circle. Wet the top edge of the bottom crust with ice water and place the second crust over the first crust . Press the edges down gently.  Using a sharp knife, trim edges by cutting against the outside edge of the tin.  You can flute the edges of the crust by taking the end of a knife, pushing it against the outside edge of the crust toward your pinched index finger and thumb, pushing the dough into your fingers. Do this all the way around the pie.  Cut four vent slits in the top crust  Voila. A finished pot pie!  Cover with the plastic lid that comes with the foil pie tin.  Repeat this process to make 7 – 8 pies. Freeze or bake immediately.  To bake, preheat oven to 400º. Bake pies for 45 – 50 minutes if fresh and 60-65 minutes if frozen until golden brown and bubbly.  Allow to cool about 5 minutes before serving. The crust is flaky and the filling is yummy!! |
|
| |
|
Oklahoma Pastry Cloth™ Company on Facebook
|
|
|
|
|

New Giveaway And A Prepper Reality
March 14th, 2016
|
It is long past time for a giveaway. How about a ‘Baking Giveaway’? We have a set of two, brand new square cake pans that are nice and smooth and ready for somebody’s favorite cake recipe. This giveaway will go through March 31st. Just leave a comment in the comment section of this post and any upcoming posts and your name and email address will automatically go into the drawing. Only one comment per post will qualify for entry. So, enter away!!   OK. Now, I have to tell you our tornado shelter story, for those of you prepared for any event. And just know, Mr. Fix-It was not happy. Being the prepared one in the family, (I was a Girl Scout all the way through Senior Scouts, don’t you know?) I put together a backpack filled with “necessities” – you know, a change of clothes for each of us, medications, a first aid kit, toilet paper and etc. I also include a bag of M&Ms, dried fruit and nuts. Oh. And a deck of cards. You NEVER know when you might need a deck of cards. This big bag sits by the back door, ready to grab as we vamoose out the door to head to the shelter at the sound of the sirens during tornado season. . Back in the fall, we had a new, larger shelter installed and we feel like regular gophers. It is a flat-top job that drops 8 feet underground and is big enough for several cots so that we can sleep down there during a long night. There are also folding chairs, a table, shelves and various and sundry emergency paraphernalia like lamps, a radio and paper towels. The door to the cellar is flush with the concrete top at ground level and lifts open to reveal a long set of narrow, metal steps to descend into our “fraidy hole” and they are quite a bit steeper than our old, small shelter. Since you already know about my lack of grace and poise, I’m still waiting for the outside handrail to be installed so that I don’t have to slide down each step on my butt. Heh! It’s a long, long jump to that concrete floor there, I’ll have you know!!     Now, prior to getting the new shelter furnished, all of our emergency stuff was still in the old, small cellar. It isn’t as fancy as the new one and is drastically smaller.  Instead of the nice, large folding chairs we have in the new place, we’ve always had some buckets of grains (you know I grind the grains to make the flour to mix the bread that MB builds). The coolness of the shelter offered a nice place for storage. The buckets were handy for putting a board across to make a bench to sit on. When I needed to get grain, I just lifted up the board and pulled off a lid to whichever type I needed. Besides our bench sitting arrangement, we also had a portable fan, a blanket that zips into a cushion, a couple of small, wooden folding chairs for extra occupants, lanterns, LED lights and radios. With tornado season having started March 1st, this past weekend we decided that we had better get everything out of the little cellar to move to the big cellar to prepare for this year’s possibilities. Soooooo, it appears, that stupid me forgot to bring up my famous emergency backpack last June after our last trip to the “fraidy hole”. It has been sitting down there all Summer, Fall and most of the Winter. And, evidently, some little field mice were tired of being bopped on the head by Little Bunny Fu-Fu, who lives under the deck, and, were hypnotically lured by the fragrance of hot, melted chocolate M&Ms (they may not melt in your hand, but there must be a caveat about backpacks in the summer). They chewed a hole through the screen on the cellar ventilation turbine and dropped their little vermin bodies onto the shelf that held our “emergency” equipment. They must have had a jolly time sliding down the metal posts of the shelving to the “bench” below to a feast of chocolate, dried fruit and mixed nuts. I bet you didn’t know that mice are crazier about chocolate than even you are!! So, those uninvited critters must have had a blast because not only did they tear up the backpack and everything in it, but having full bellies, they then tore into the package of 8 rolls of paper towels. They chewed, burrowed and chewed some more to make nests in order to have babies and then to raise those little tikes to make more nests to make grandbabies and great-grandbabies. There must have been ten generations because the entire floor of the cellar was covered in mouse droppings and urine….all the way to the corners. EVERYTHING was covered. And they messed all over the shelving, the radios, the lanterns, the fan, the wooden plank and even the buckets. As we stared at the total destruction before us, Mr. Fix-It muttered to me how insanely stupid it was to have an emergency backpack with M&Ms, dried fruit and nuts. He wanted to know exactly why I felt the need to have such a backpack. I meekly pointed out so many of our neighbors who, two years ago in the May 19th tornado, had their homes totally destroyed – nothing left, no clothes, no food, no meds, no nothing. We had been very fortunate. In a case like that, my backpack would at least keep us from being naked and, I smiled, we could always stay entertained with the cards. He was not amused. Mr. Fix-It donned a mask so he wouldn’t catch Hantavirus Pulmonary Syndrome which I have no idea what it is or what it does. He put on tall, rubber boots and rubber gloves and headed down into the abandoned concrete mouse mansion. He dragged everything out, throwing away what could not be salvaged and stacking what I was to scrub with bleach water and soap. For hours I scrubbed items, sprayed them down, dried them off and then put them into the direct sun, while he continued carrying things up the stairs to me. What items I could throw into the washing machine, I did so in hot bleach water. The backpack was a total loss and was tossed in the trash – clothes and all. Evidently, the rodents had gotten tired of living in filth because we did not find one, single animal, although we gingerly pulled everything apart, fully expecting to be startled by an escaping mouse. Finally, Mr. Fix-It got the shop-vac and sucked up anything loose, tossing the filter when he finished. Next, the floor, walls and ceiling of the cellar were scrubbed with bleach water and soap. We left the door opened the rest of the day to dry the shelter out and crawled to the house, exhausted. So, the old cellar, which is in like new condition (if nobody knows about its recent inhabitants) is now clean and ready to be dug out to hopefully go to the daughter’s family backyard. And I have my new, big cellar all ready to have a tornado party. Oh yes, and for that party, I AM putting together a new backpack with a change of clothes, a first aid kit, meds, a bag of M&Ms, dried fruits and mixed nuts…and a deck of cards. I might even add the game, Taboo. But I won’t be leaving it in the shelter, ever again. Heh heh. |
|
| |
|
Oklahoma Pastry Cloth™ Company on Facebook
|
|
|
|
|
|
|

Italian Cream Cake
January 24th, 2016
|
The other cold-to-the-bones, dismal, misty night, Mr. Fix-It said he was really, really, really wanting a dessert. We aren’t eating many desserts since the discovery of my thyroid issues. Of course, Mr. Skinny Fix-It can’t eat anything if I can’t eat anything, right?! So, with the wood stove finally blazing, to make the house toasty warm, dogs sacked out around it like stuffed animals tossed aside, I decided to be nice and make him something special – an Italian Cream Cake. Ever since Sir Flying Ace’s and Miss Amelia Air-Heart’s wedding, Mr. Fix-It has been wanting another Italian Cream Cake. Only, he wanted it the way their wedding cake was – no coconut. It does make a difference – especially for those who aren’t crazy about coconut!! Now, you know me. I had to find out the background on Italian Cream Cakes and so I researched and researched and guess what. There IS no background on Italian Cream Cakes. This is the best I could come up with from Answer.com and a recipe book: “While the Italian Cream Cake has its roots in renaissance Italy, the first written record of it is first seen in Canada in 1913. It is not until 1937 that the first recipe of Italian Creak Cake surfaces in the Plano News from Texas. Over the years the recipe has grown more complicated, though it is adored for its endless flavor combinations.” And “Not much is known about the origin of the Italian cream cake. The recipe apparently first appeared in the southern part of the United States and was the creation of an Italian baker who had moved to the U.S.” Evidently, we rednecks are more crazy about this cake than are Italians. That would make sense since it is all about butter and pecans! So here is my version of the Italian Cream Cake. And just a note, I use my own, homemade bourbon vanilla which I’ll show in an upcoming post. Preheat oven to 350º Ingredients: Icing:
            |
|
| |
|
Oklahoma Pastry Cloth™ Company on Facebook
|
|
|
|
|
|
|

Not Old Yeller – A Dog Story With A Happy Ending!
January 19th, 2016
|
Story With A Happy Ending!  Hi y’all! Hope your new year of 2016 has started with a bang and that the cold weather has made you want to create something warm and wonderful in your kitchens! It is hot tea and muffins weather for sure!! I thought that I would tell you a really happy story – one that I hope will encourage somebody out there with a similar situation. It’s about a dog. Yep…a good ol’ dog story.  I haven’t talked much about our menagerie of pets here at our Okie digs, but we seem to be animal magnets for other people’s animals. We inherited a cat, named Sway, from a newly married friend of the daughter’s way back around 2005 when the new hubby decided he hated cats. Of course, we were assured, “If you’ll only take him for a week, we’ll find him a home.” I don’t think that children, adult ones included, have any concept of time. Really.  And then, of course, we have our precious Ellie, who ran in front of our car when we were on a trip to visit friends. We almost hit her and she was so very little (around 12 weeks old) and pitiful that we stopped, took her to the house from whose yard she bolted, only to be told that she had been dumped a half hour previously. She was so covered in fleas that it was like her skin moved and she was so thin and dehydrated that we were not sure she would make it. She had short hair on her body, but her tail and ears had long hair. We determined that she was a purebred, long-haired dachshund – probably from a puppy mill – but that because she had such an atrocious overbite, she had been dumped as unusable – unbreedable. We drove all the way back to Oklahoma City with this creature in a box and on arriving at home, dumped her into a tub of warm water, flea soap and oils. We washed her three times in fresh water and soap. She became a beautiful dog and has been the joy of our lives. She is in her waning years, with heart trouble, but is still a doll.   And then, a year ago, along came Mustard. Mustard is a very miniature short-haired dachshund who jumped into my car one day, in a busy intersection. He was running back and forth between cars, looking up into the windows as if looking for his owners. I finally found his owners, after canvasing the neighborhood for hours but they informed me that they didn’t really want him and that their pit bulls didn’t want him either. Mr. Fix-It was NOT amused when I showed up with another scared, little dog but as is always the case, he and Mr. Mustard are inseparable.   Finally, there is Blue Belle – better known as Belle. Belle, a blue heeler/Catahoula Leopard mix is “Sir Flying Ace’s” dog. When he and “Amelia Air-Heart” married, they could not have a dog where they lived and so we inherited Belle for the time being. She is getting older – around 10 years old – and is slowing down. There is a feeling of extra responsibility when taking care of someone else’s dog. Kinda like taking care of your grandchildren!! So, anyway, when Mr. Mustard bounced off of the couch one night, right onto Belle’s back, causing Belle to literally let out a scream, there were definitely feelings of consternation on the part of me and Mr. Fix-It. But after Mr. Fix-It left the next day for a week in Houston and I tried to get Belle out of her kennel for her morning constitutionals, the feeling changed to horror. Belle was paralyzed from behind her shoulders down. She could pull herself forward on her front legs, but her back legs dragged behind her dead and useless. I couldn’t believe it and immediately called the vet. I carried this 40 lb dog, by myself and on a bum ankle, into the vet and cried when I was told that she would not get better. According to the x-ray, she had two ruptured discs at the top of her spine. Without a $5000 surgery, that might not even work, she would have to be put down. I took her home and spent the next few days carrying her outside and manually helping her to use the bathroom, then laid her on a mat in the dining room and administered muscle relaxers and pain meds to see if maybe, by some miracle she would get better. She was eating and drinking great but I could tell that her kidneys and intestines were starting to shut down. I called my son and asked what to do. He said to do whatever I had to. Mr. Fix-It wanted to come home, but had meetings and I insisted that he stay put. By Thursday morning, Belle was worse, and I was resigned to having to put her down. However, acting on a suggestion from a close friend, I called a chiropractor in a neighboring town to see if he ever had worked on dogs like this. Dr. Hanson was totally positive. He told me to have Belle sedated and muzzled and to bring her up that night, along with x-rays. I carried Belle into the office, among patients who had evidently been told the story. Everyone was so supportive and cooed over Blue Belle, who isn’t really a very friendly dog to strangers!! (she’s a blue heeler, don’t you know!) And by this time, trust me, I had developed some muscles!! Dr. Hanson viewed the x-rays and said that no, there were no ruptured discs, they had misread the x-rays, but that there was a disc down by the hips that was rotated almost to upside down. He showed it to me and said, “I can fix this.” He was very aggressive at working on her spine and she squalled. I was told to bring her back the next evening, which was a Friday. On Saturday, Mr. Fix-It arrived home and I had carried Belle out into the sun to warm and in hopes that she might go to the bathroom while lying in the grass. As we were talking, I looked out and Belle was standing at the foot of the steps, looking up at me through the windows as if to say, “You gonna come get me?” I squealed, “She’s standing up !!!!” Mr. Fix-It had not seen her at her worst and so I’m not sure that he quite understood the miracle that I was witnessing but I ran out and gently hugged that dog. She simply stood there and did not move, but by jove, she was standing. Mr. Fix-It carried her in and put her back onto her pad.  After a total of 6 sessions at the chiropractor, at $35 per session, Belle was running outside. She could wag her stump of a tail and all of her bodily functions were completely back in sync. And she is still running a month later. The chiropractor said that we would need to watch her and if she starts to limp to bring her in for an adjustment every so often. We have told Sir Flying Ace to find a chiropractor who will work on dogs down in his area just in case. There are bunches.  So this is to encourage you to try chiropractic on your paralyzed pets BEFORE you make such a serious decision to have them put down. I can’t say enough how much we appreciate Dr. Hanson’s efforts. Pretty awesome!!! |
|
| |
|
Oklahoma Pastry Cloth™ Company on Facebook
|
|
|
|
|
|
|
Ham and Egg Tostadas
July 21st, 2015
|
Last week, I shared with you the fact that, though one can think that one has all things under control, the reality usually rears its ugly head and one finds out that one has NOTHING under control! My dad used to tell about a professor at the University of Kentucky, back in the 1950s, who used to quip that as soon as you think you have control over anything, just take a big rock, hold it over your foot, drop it and then WILL it to stop. That will cure you of that illusion. BUT….I also have been taught to make lemonade out of lemons, or in this case, ham and egg tostadas out of ham that I didn’t get to serve! We love these breakfast yummies and the ham that I had to can after the disaster at our son’s rehearsal dinner has come in really handy! They are wonderful for a brunch as well and look so pretty on the plate.  Home canned ham is wonderful for this breakfast treat, but you can used any kind of ham you like. It just needs to be shredded or chopped. Toss 1/2 cup of ham, per person, into a hot skillet that has been wiped or sprayed with a little olive oil and toss until thoroughly heated. Remove ham to a bowl or plate and place in a slightly warmed oven.  Ingredients:  Add a tbsp. of butter and a tbsp. of olive oil to the skillet and heat until butter is melted.  Prepare one corn tortilla per person and place into hot oil for about 30 seconds. Quickly flip and allow to cook until puffy places start appearing. Pick up with tongs and transfer to a paper towel and pat to remove excess oil. Repeat until all tortillas are cooked. You want the tortillas to be tender, not crispy. Add more oil and butter as needed. Stack on a plate and place into the warmed oven as well.  In a bowl, add one to two eggs per person with 1 tbsp. of milk per egg. Add a dash of salt and pepper and whisk until well-scrambled. In the skillet that is still hot and has the remaining oil and butter in it, add eggs and stir to cook. When about half-cooked, add onions and green peppers. Continue stirring and tossing to scramble the eggs.  On each plate, place one tortilla in the center and top with 1/2 cup of ham. Add eggs, onions and green peppers on top of the ham. Sprinkle shredded cheddar or Monterey jack cheese over the surface of the eggs. If the cheese doesn’t melt right away, microwave for a few seconds to melt it. Add freshly chopped tomatoes and picante sauce. Garnish with fresh cilantro and sour cream or guacamole if desired. |
|
| |
|
Oklahoma Pastry Cloth™ Company on Facebook
|
|
|
|
|
|
|
Because Mama Can
July 11th, 2015
|
of Mice and Men and Wedding Planners  Well, we did it. We got the boy married off. Sir Flying Ace and his precious Miss AirHeart tied the knot to fly the friendly skies, united. The wedding was beautiful. The venue was breath-taking and the rain was pouring right up until 30 minutes before the outdoor service with beautiful weather until rain returned just as the guests started leaving. God is gracious. And THEN there was the rehearsal dinner. That was assigned to me and Mr. Fix-It. We were supposed to put together a Texas Bar-B-Q shindig, at the request of Sir Flying Ace, from 9 hours away and in a venue never seen before – actually to be seen, for the first time, on the morning of the day of the dinner. Piece of cake, right? Wedding cake, that is. Well, anyone who knows me knows that I love to put together an event. I love designing the invitations, making the favors, coming up with decorations, planning the menu – all of the creative things that go into making a memory. Getting it served and dealing with the chaos? Not so much. But I was a woman with a mission and for 3 ½ months, I spent night and day making notes, making lists, sewing, gluing, designing, printing and on and on. It was so much fun. Putting the centerpieces together was a blast. I even made the stands for the airplanes by cutting Plexiglas and then bending it with my curling iron to form these stands on which the airplanes could be hot glued. We were not allowed to bring any glass to the dinner venue, so everything had to be paper, plastic or metal. The candle holders were sheets of frosted Plexiglas, glued together and filled with iridescent beads to hold LED tea lights. The surface for each centerpiece was a red charger from Hobby Lobby, topped with a doily, blue bonnets and greenery.  Because all this was occurring in a small town and because I was not familiar with the restaurants – what ones there were – and because I love to bite off more than I can chew, (no pun intended) I came up with the brilliant idea to smoke turkeys and hams and purchase smoked briskets to freeze ahead of time and then cart down to Texas to heat in wonderful, roasters that would double as serving stations. I got all the fixin’s for “from scratch” baked beans – three gallons of them – cole slaw, chips, all of the condiments and sauces, hors d’oeuvres , and desserts and all was packed into carefully labeled boxes to be stacked in various vehicles for transport. I was on an organized roll.   But you know that poem by Robert Burns about the little mouse and best-laid plans? Yeah, I was the mouse. The night of the party, the tables were set, with favor boxes placed in a row down the center of each one, burlap banners were hung with bows and the serving tables were cute as could be.   I was dripping in sweat with hair plastered to my head, but planning on hitting the shower within a few minutes. And then, it happened. An hour before guest arrivals, my friend, Deborah, hurried up to tell me, in hushed tones and through gritted teeth, that none of the food was cooked. None of the roasters were hot. The crock pot with cheese sauce wasn’t even warm. She and a couple of other friends were rushing from one roaster to the next, moving them to plug them into different outlets, only to find that none of the outlets worked. The beautiful, expensive venue was wired so badly that it would not even support the crockpot. Every electrical outlet would blow just as soon as anything was plugged into it. No food. Nothing but cole slaw, potato chips, hors d’oeuvres and dessert. Now, I COULD tell you that I, in my calm and organized manner, took all in stride and barked orders, totally in control of the situation. Nahhhh. I grabbed my cell phone, saw that I had NO service, and began walking up a hill to try to gain service, all the while punching buttons to reach Mr. Fix-It. The longer I walked, no – limped, the more I gulped for air, probably hyperventilating. Finally, I got hold of my hubby. Now, I COULD tell you that I calmly explained the situation to him so that we could reason a solution together. However, I probably should admit that when I heard his voice, the tears rolled down my sweaty cheeks and I wailed, “We HAVE no food!!! We have 40 to 50 people coming in 30 minutes and we HAVE no food!!!!” I hiccupped. He, being the typical man, responded, “What do you MEAN we HAVE no food? What was all that junk we drove with for eight hours??” I explained and then, in a matter of seconds, a plan began to form in my racing mind. That morning, at the HEB Grocery Store, truly the establishment that gives reason why all should move to South Texas, there had been a sign advertising a shrimp and crawfish boil for the day. It would last from 11am until 6 pm. I looked at the time. It was 4:45. I breathlessly cried, “Shrimp!! Get some shrimp at the stand at the grocery store. See if they have enough for us to buy plenty. And get their corn-on-the cob too!” Mr. Fix-It got very quiet as he calculated what that was going to cost him and then asked, “How much? How much shrimp?” I told you that my mind was a-whir. I told you that I was not calm. I told you that I was out of breath and had tendrils of hair clinging to my neck, face and forehead. That is my excuse, because instead of saying, “Enough for 40 or 50 people.” I said, “Enough for 40 or 50 POUNDS.” Oh yes. I did. And being the obedient, dutiful husband that he is, Mr. Fix-It went to the booth, explained the situation and spent $400 on 40 lbs. of freshly-caught and steamed gulf shrimp….a pound per person. I, on the other hand, had only enough time to run into the venue restrooms and put my entire head under the faucet of the sink, where I let cold water run over hair and skin alike. I took an extra shirt and used it as a towel, and then dried my hair under the hand dryer. Fortunately I had a change of clothes and makeup with me, as well, and so, I pulled my hair up into a ponytail, donned fresh clothes and makeup and pretended to be as cool as a cucumber. The shrimp was a hit and fun was had by all and most were none the wiser.  What, do you ask, did we do with all of the food? Two turkey breasts, two full hams, three briskets, 20 lbs of shrimp and three gallons of baked beans? Well, we got dry ice and took all of it home where I canned 21 pints of ham, 21 pints of beans and 14 pints of turkey and froze three briskets, as well as 20 lbs of shrimp in 2 lb bags. And in the next several posts, I’ll show you some recipes for that canned meat. Oh. And did I tell you that there WAS a wedding?  Your Pants! |
|
| |
|
Oklahoma Pastry Cloth™ Company on Facebook
|
|
|
|
|
Shout Out
June 29th, 2015
|
Heh all! Well, because of all your help, we got the votes we needed and qualified to be considered for the Mission Main Street Grant! I can’t thank you enough for all your support! We got way more votes than we needed! Now, I am long past due giving a shout out to a really amazing lady who is helping people all over the internet with her cooking channel. Hands That Cook offers all kinds of recipes, tips and demonstrations that are easy to follow. She has a wonderful knowledge of cooking skills and a heart to share them with those who wish to learn. Though she likes to remain anonymous, the videos and voice are warm and inviting and I know that you will get a lot out of them. She has a diverse following who obviously love her to pieces. Hands That Cook ordered one of our Oklahoma Pastry Cloths™ and it was certainly a pleasure working with her. She liked our product so much that she did a show about a 100 year old pie crust recipe that she uses while offering a great review of the pastry cloth. You can enjoy it here: It is so wonderful to see how our products are making life easier and pleasant in kitchens across the country and even in other countries. That is our goal!! We tried Hands That Cook’s recipe for pie crust and it was wonderful.  And of course it had to be an apple pie. Yummy! Thanks to Hands That Cook for a great recipe and a wonderful testimonial. |
|
| |
|
Oklahoma Pastry Cloth™ Company on Facebook
|
|
|
|
|

|
 Homestead Revival
 Paratus Familia
 Rural Revolution